Build a showcase demo with an M camera and two bins
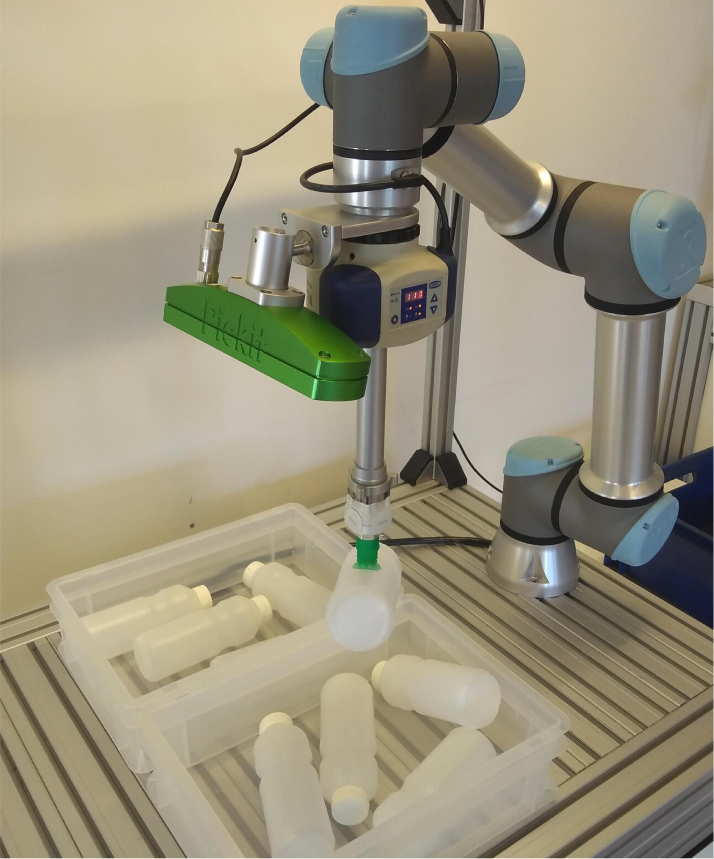
This article will guide you in setting up a simple showcase demo with Pickit and a UR robot. For this demo a Pickit M camera is used to detect bottles in a bin. The parts are picked from the bin with a UR5e robot and a vacuum cup. A video of the end result can be seen below.
Requirements
The list below shows the hardware that has been used to set up this demo.
Pickit system with M camera
Mounting plate to mount camera on to the robot
UR5e robot
Stand to mount the robot on
Schmalz Vacuum gripper ECBPi 12 24V-DC M12-8, 15 cm extended with vacuum cup SPB4f 40
Two bins with size 400 x 300 x 120 mm
Bottles of ø65 mm and length 200 mm
Mounting instructions
The robot is mounted on the stand.
The camera is mounted on the robot flange of the robot with the help of a mounting plate.
The vacuum gripper is mounted on the robot flange beneath the camera. To prevent collisions between the camera and the bin, the distance between the tip of the gripper and the camera should be larger than the bin depth. In the example, the bin is 120 mm deep and the distance between the gripper and the camera is 150 mm.
The bins are placed next to each other, and their center is 550 mm in front of the robot base.
Setting up the Pickit files
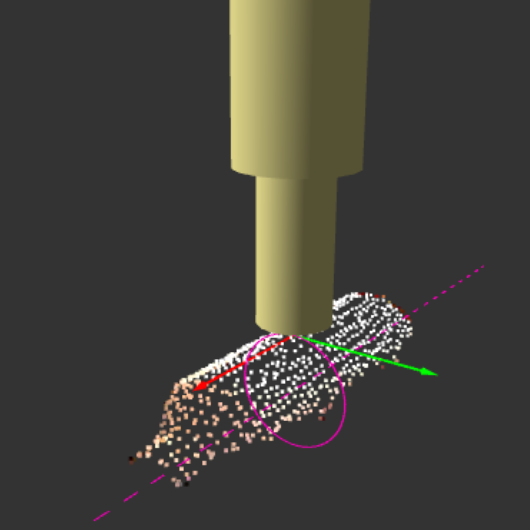
Here you can download a snapshot of the demo. In the snapshot, you can see that the bottles are detected by using the Teach detection engine with a single model.
Setup file
For this demo, two Setup files are defined, one for each bin. For both files the Region of Interest (ROI) has similar dimensions as the real bin. The height is set to be higher than the real bin, so if the parts are stacked they can still be detected. The bin is modeled in the collision environment for collision prevention with the robot tool. Also a empty ROI box value is defined, so we are able to determine if a bin is empty. Last, the ROI boxes are attached to the Robot base frame. No other settings are used for this demo.
Need help with these settings? See the Setup article for more information.
Product file
For this demo, one product file is defined with a single Teach model. The model that is being used is the shape from the side. The matching score and tolerance are set to 80% and 4.8 mm. No fusion or downsampling is applied and the detection speed is set to Normal.
Need help with these settings? See the Teach article for more information.
In the Picking page, the pick point of this model is located on the surface of the cylinder, with the X-axis pointing along the bottle’s length. Since this object is symmetric, the pick point should have a symmetry axis, allowing the tool to pick the bottle anywhere around the pink circle.
Also, collision prevention is used. A simple cylinder shaped tool is used here.
Need help with these settings? See the Picking article for more information.
Calibration
The next step is the robot-camera calibration. This process teaches Pickit where the robot base is located w.r.t. to the camera. This information is used to transform the object pick points into robot coordinates. A detailed description in robot-camera calibration can be found in the article Calibration.
Setting up the robot program
Here you can download the UR robot program. The idea of the program is to pick bottles from one bin and drop them in the other bin. The robot will change bin if the bin is empty or if no valid objects are found for a few times in a row.
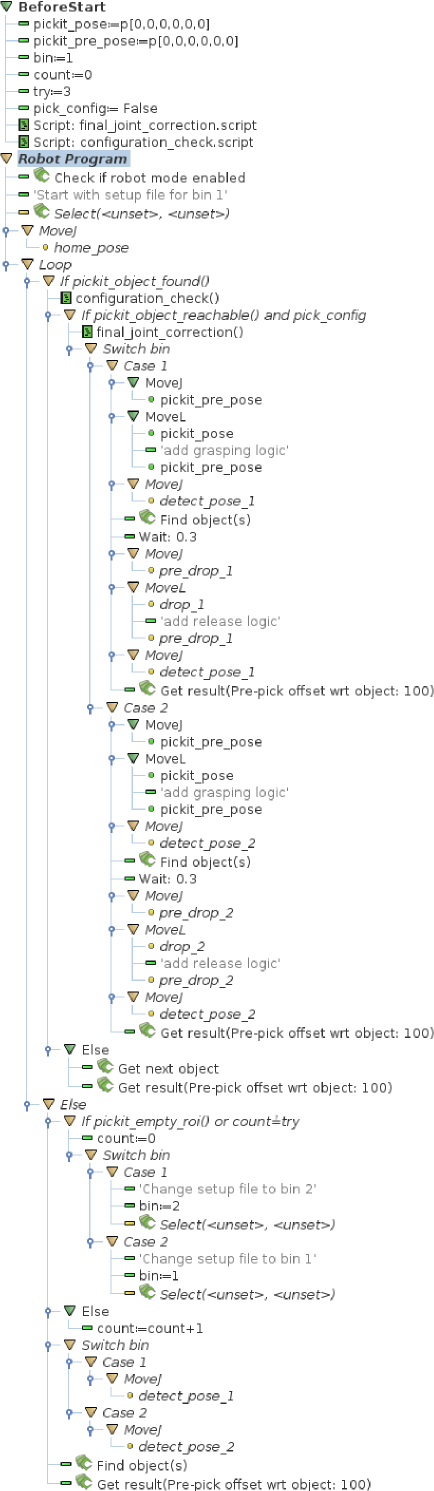
The following still needs to be defined in this robot program:
Pickit Select command, the correct setup and product file need to be filled in. First the setup file for the first bin is selected.
The home_pose is a start position of the robot.
For the picking sequence if an object in bin 1 is found following needs to be added. A grasping logic to pick the part. Detect_pose_1 is a waypoint 650 mm above bin 1. Pre_drop_1 and drop_1 are waypoints to drop off the parts in the other bin. A release logic to drop off the parts.
Similar settings need to be defined for the picking sequence if an object is found in bin 2.
In the Else clause for object found the Select commands for Pickit need to be filled in correctly. If bin 1 is active the setup file is changed to bin 2 and vice versa.
In the robot program, two script file function are defined and used. The idea of function final_joint_correction() is to not rotate around the 6-th axis of the robot when picking objects. This is done to make cable management easier for the camera that is mounted on the head of the robot. Note that this is possible because the bin drop-off doesn’t require knowing the exact part orientation.
To get rid of movement around the 6-th joint. The current joint position is compared with the calculated waypoints by Pickit. Then the variable waypoints are altered to have the same joint position for the 6-th axis as the current one. This function is executed before the program moves to these positions.
def final_joint_correction():

pickit_pre_joint = get_inverse_kin(pickit_pre_pose)
actual_joint = get_actual_joint_positions()
joint_cor = actual_joint[5] - pickit_pre_joint[5]
pickit_pose = pose_trans(pickit_pose, p[0,0,0,0,0,joint_cor])
pickit_pre_pose = pose_trans(pickit_pre_pose,p[0,0,0,0,0,joint_cor])

end
The second function, configuration_check(), is an additional check to be sure that the robot stays in his current configuration. Before picking the object it is checked that the robot does not have to rotate more than 45 degrees around his base joint. When the robot would need to rotate more to pick the part, this location is then labeled as unreachable and will not be picked by the robot. This will limit the robot to pick parts in all possible directions, but it will ensure that during the demo no strange moves are encountered.
def configuration_check():

if is_within_safety_limits(pickit_pre_pose):
current_joint = get_actual_joint_positions()
pre_joint = get_inverse_kin(pickit_pre_pose)
if norm(current_joint[0] - pre_joint[0]) < d2r(45):
pick_config = True
else:
pick_config = False
end
end

end
Note
Both script files can be immediately used as there are shown in the provided robot program. No need to change any parameter.
Interaction with the running demo
This demo is robust and will keep on working continuously. Interaction with the scene is possible: Parts can be placed under angles, taken away and so on.
Note
It is advised to only alter the contents of the bin the robot is currently not picking from.