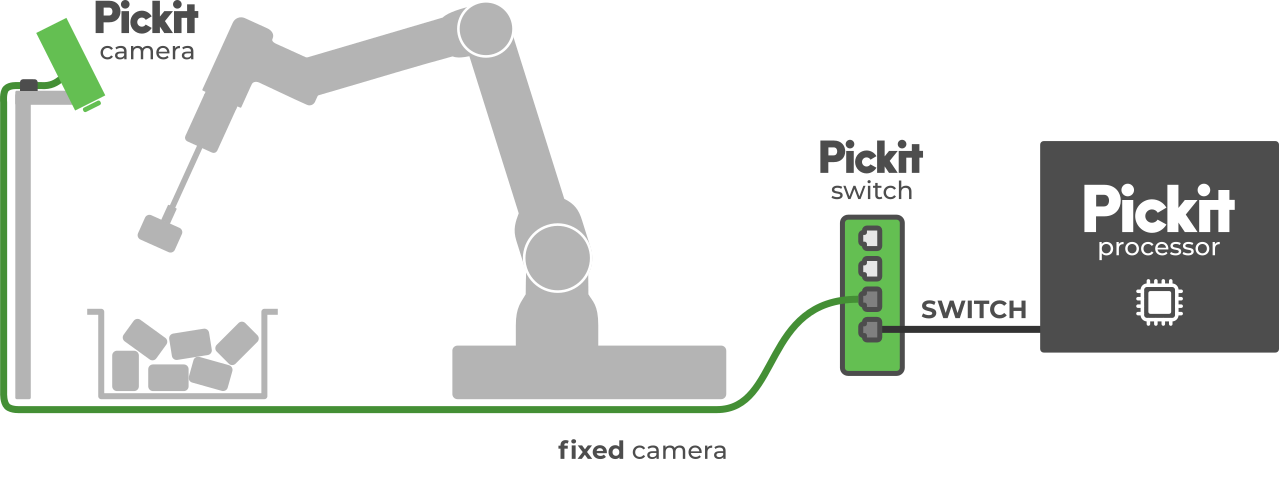
Connect the components
Note
This article covers Pickit systems with second-generation cameras. If you have a system with first-generation cameras, please refer to the companion article.
In this article you will learn how to connect the different components of a Pickit system together, to your robot and computer:
In the most typical way, the camera and robot connect to the Pickit processor via the switch provided with the Pickit system (below left). The optional components connect directly to the processor (below right).
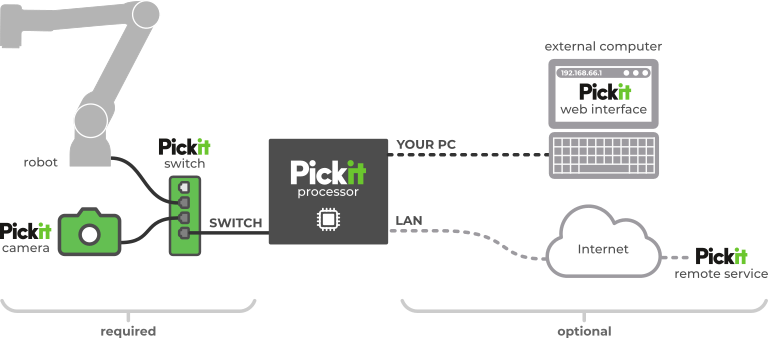
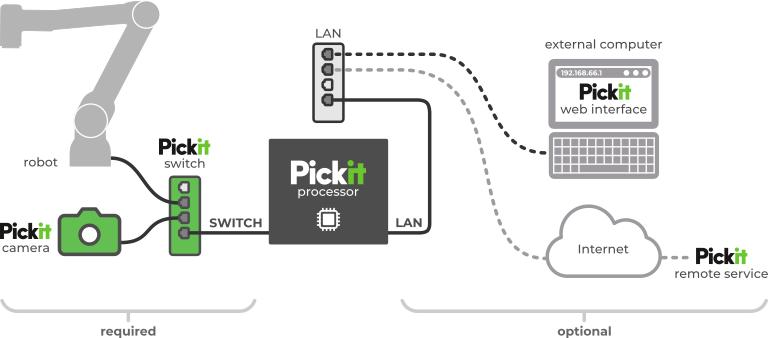
Alternatives where the external computer (shown below), robot, or both connect to the Pickit processor through a local network are also possible. This option can be attractive, because from a single computer with a single network connection, one can:
Monitor multiple components of a robot cell: Pickit, a robot, a PLC or some other machine.
Monitor multiple robot cells, hence multiple Pickit systems.
Monitor from a station located physically outside a particular robot cell.
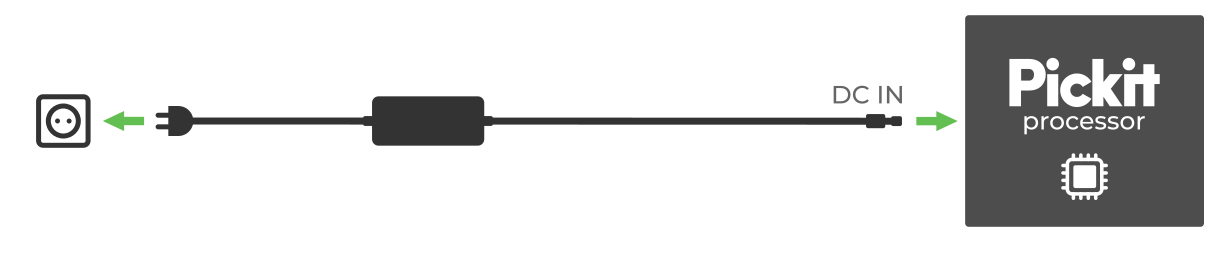
Pickit processor
Mount the processor in its desired location and connect it to the power supply. It will automatically boot once powered, and can be turned on/off by pressing the power button once.
Refer to the mounting and installation details to learn more about mounting options (rack, wall) and alternative power supplies.
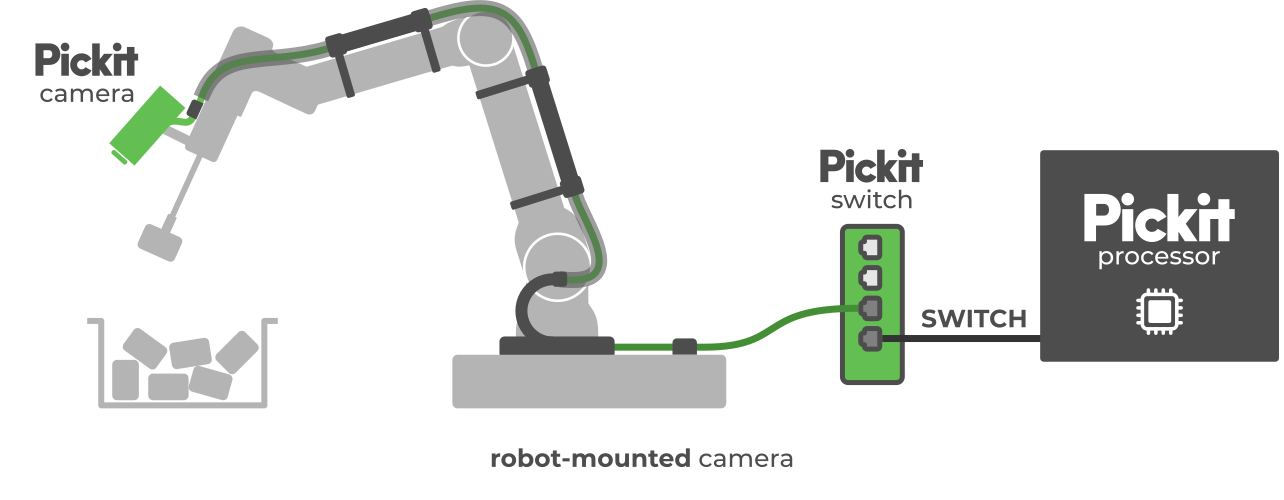
Pickit camera
Mount the camera following the best practices and connect it to the Pickit processor according to the instructions the camera type and mount.
External computer
There are two ways to connect an external computer to the Pickit processor for the purpose of accessing its web interface. They are both illustrated in the diagrams at the top of the article. One of the provided 5m Ethernet cables can be used for this.
Direct connection
This is the most common way to connect to Pickit. Connect the external computer computer to the Ethernet port labeled YOUR PC on the Pickit processor. The computer will be assigned an IP address by the Pickit system. Once connected, the Pickit web interface can be accessed by pointing a supported web browser to http://192.168.66.1.
Connection through a network
Connect the LAN Ethernet port of the Pickit processor to a router or switch of your network.
By default, an IP address will be assigned to Pickit using your network’s DHCP server and Pickit will be available at http://<assigned_ip>/. Alternatively, you can assign a static IP to the Pickit processor.
To reach the web interface from your network, follow these steps (using the direct connection described in the section above):
Connect the external computer directly to Pickit using the YOUR PC port.
Access the Pickit web interface by pointing a supported web browser to http://192.168.66.1.
Enter the LAN port configuration, and modify it if needed. Take note of the port’s IP address.
Disconnect the external computer from Pickit’s YOUR PC port and connect it to your network.
Access the Pickit web interface by pointing a web browser to the LAN port’s IP address.
Robot
Note
If you have a fixed camera mount, you can perform Pickit object detections without a connected robot, so this step is not required to start familiarizing yourself with Pickit.
Similar to connecting an external computer, there are two ways to connect a robot to the Pickit processor, which are illustrated in the diagrams at the top of the article. One of the provided 5m Ethernet cables can be used for this.
For a direct connection (the most commonly used), the Pickit processor port labeled SWITCH is used.
The robot connects to the Pickit switch, which is itself connected to the processor’s SWITCH port (as illustrated above).
The default configuration of the SWITCH port is to have the 169.254.5.180 static IP address, but it can be modified in Pickit’s network settings.
To connect through a network, follow the instructions described here for setting up the LAN port, and connect the robot to your network.
It may be required to additionally configure the network settings in your robot.
By default, Pickit robot integrations assume a connection via the SWITCH port, and expect Pickit to be reachable at the 169.254.5.180 IP address.
To modify this, refer to the specifics for your robot brand.
Pickit remote service
This connection is used for the exceptional event where remote Pickit service over the Internet is required. It requires connecting the LAN port of the Pickit system to your network, and following the steps for bringing your system online. During normal operation, it’s not required to have this connection enabled.