Warning
You are reading the documentation for an older Pickit release (2.2). Documentation for the latest release (4.0) can be found here.
Pick points in Pickit Teach
Once a Pickit Teach model has been taught, pick points need to be associated to it. A pick point represents where an object can be picked by the robot. It is specified as a position and orientation relative to the object, where the robot Tool Center Point (TCP) should move to perfrom a pick. What constitutes a good pick point depends on both the gripping device and the object to be picked.
This article focuses on how pick points are created and managed, and the companion example applications article presents a number of real scenarios and how to make the best use of this feature. The way in which an object is picked can also be used to determine how to correctly place it at a drop-off location. A number of useful and easy to program place strategies are exemplified in Smart placing using pick point data.
Multiple pick points per model
A single object can often be picked from more than one point. Having multiple pick points associated to a single Teach model has a two-fold advantage:
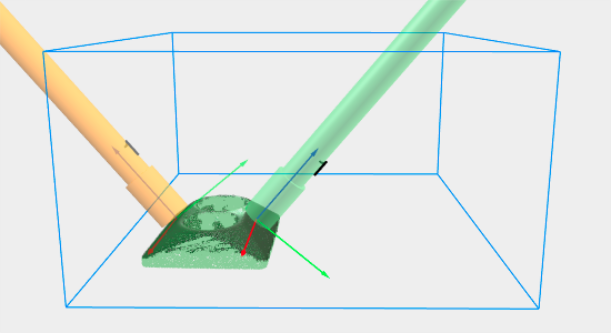
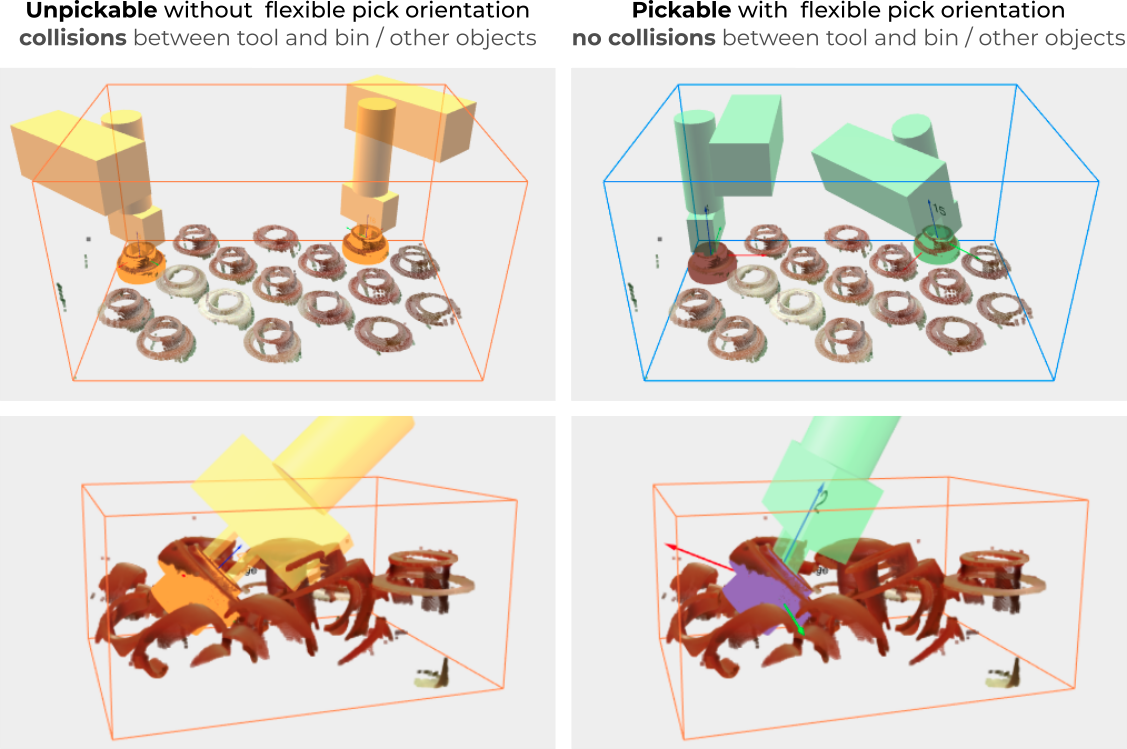
Increase the likelihood that objects are pickable even if they overlap or are close to bin walls. Below, two possible pick points for picking a socket with a suction gripper are shown: the left one (in orange) is unpickabe due to collisions with the bin, while the right one (in green) is pickable.
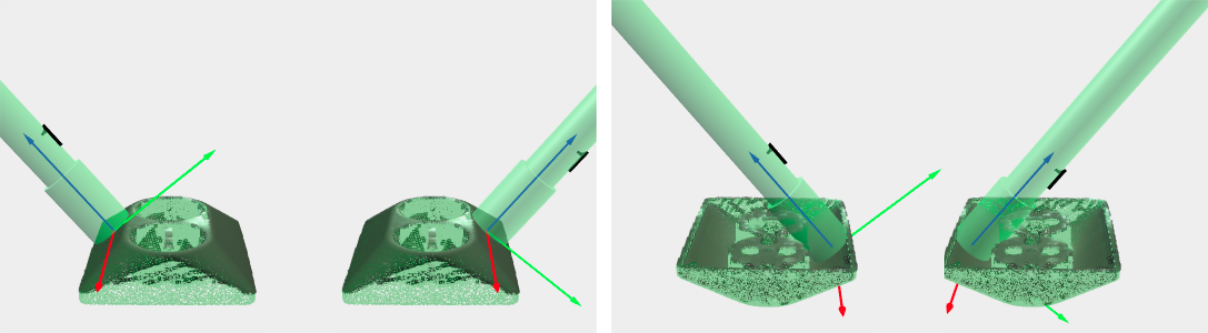
Specify pick points for models where only one part is visible at a time. This is the case for full object models taught from CAD. Below, pick points for the top (left) and bottom (right) sides of a socket are shown.
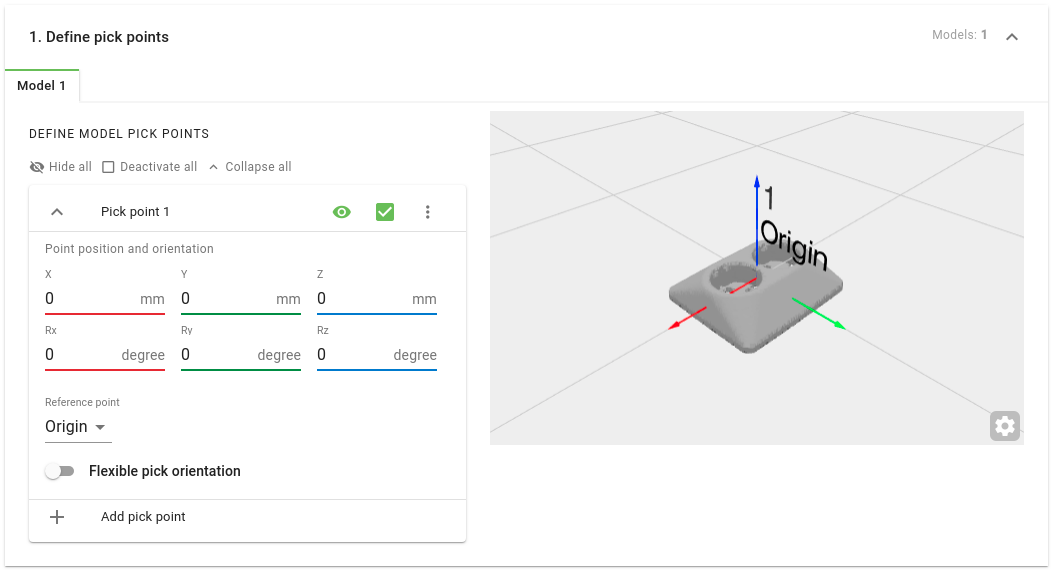
The Define pick points section of the picking page allows to create and manage the pick points of Teach models:
Create a new pick point by clicking Add pick point. Once created, a pick point can be enabled/disabled and its visibility can be toggled.
Duplicate or delete an existing pick point by clicking on the ⋮ button.
Set the Point position and orientation, which specifies its location with respect to the object origin, or optionally with respect to an existing point by changing the Reference point.
Optionally, specify a Flexible pick orientation (more).
Having multiple pick points may affect the way you want to drop-off the object, after picking it. For example, this article shows a case where the robot places the object in a different drop-off position depending on the used pick point.
Pick point reference
The pick point reference plays an important role for drop-off compensation. By default, the position and orientation of a pick point A is expressed relatively to its origin. However, this can be specified with respect to another pick point B instead, by setting pick point B to be the reference of pick point A. This is useful if you want to benefit from multiple pick points, and still drop off the object at the same location, for all pick points. In this example, your robot program would only need to define a placing position for the reference pick point (B), and the object would be dropped off always the same way, whether it was picked using pick point A or B. Learn how to achieve this with this example of such a case.
Flexible pick orientation
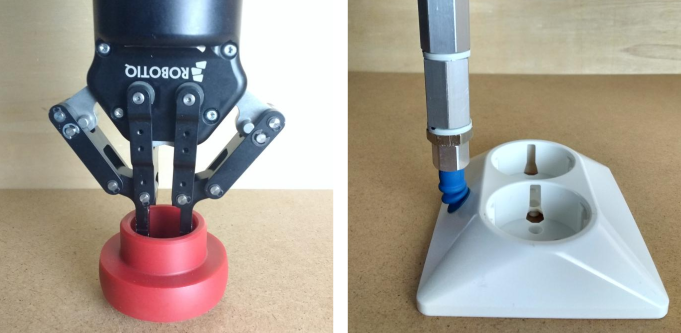
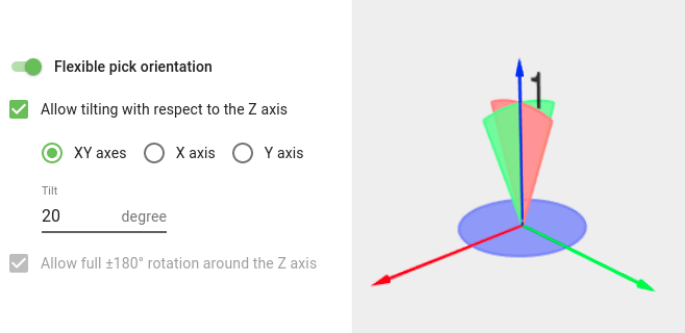
In practice, many applications can tolerate some variation with respect to the nominal pick orientation without compromising pick success. Taking advantage of this can increase the likelihood that individual pick points are pickable by the robot. This flexibility is typically due to shape symmetries, (e.g. a circular object, below left), or robot tool compliance (e.g. suction cup bellows, below right), and is represented in Pickit by a pick point’s Flexible pick orientation.
Pickit allows the pick point orientation to tilt around the X and/or Y axes, as well as to rotate around the Z-axis (below, left). Flexibility around each axis is represented in the 3D model view as a circular sector as wide as the specified interval size (below, right).
The image below highlights the beneficial effect of flexible pick orientations on increasing the likelihood of finding pickable objects. Without it, the shown objects would be labeled as unpickable by Pickit due to collisions between the tool and the bin or other objects. The example applications section describes further scenarios where flexible pick orientations can be used.
Note
Both multiple pick points and flexible pick orientations are complementary strategies for increasing the likelihood that an object is pickable.
Tip
Flexible pick orientations, in combination with the preferred pick point orientation can be used to favor picks that are easier and faster to reach by the robot (e.g. less wrist motion, lower occurrence of unreachable points).
In some applications, you may want to drop-off the object in the same location independently of how it was picked (which pick point and how orientation flexibility was used). This article shows two different examples where this goal is achieved.
Selecting which pick point to use
When an object has multiple pick points, Pickit smartly selects the best one to use. It does so by following these steps:
Sort the pick points from highest to lowest. Note that this depends on how a particular object is oriented in the scene.
Go over the list of pick points starting from the highest one.
Is the preferred orientation pickable? Determine the orientation that is closest to the preferred pick point orientation. If it’s pickable, use it to pick the object, else continue with the next step.
Is there a pickable configuration? If the pick point has a flexible pick orientation, search for a pickable configuration. The search will favor configurations that deviate as little as possible from the preferred pick point orientation. If a pickable configuration is found, use it to pick the object, else continue with the next pick point.
No pickable points? If no pickable point is found, the object is labeled as unpickable.
Tip
If you click on a particular detection in the detection grid, you can learn which pick point was selected for picking. Also, if an object is unpickable, you can learn the reason why its pick points were not pickable.