Warning
You are reading the documentation for an older Pickit release (1.10). Documentation for the latest release (4.0) can be found here.
URScript
Note
This article describes the legacy way of using Pickit with a Universal Robots. For new systems, please refer to the URCap.
The setup of Pickit with a Universal robot consists of 3 steps:
Setup the network connection
Hardware connection
The Pickit processor has to be connected to the Universal Robots controller using an Ethernet cable.
This Ethernet cable should be plugged in:
The ROBOT port of the Pickit processor;
The Internet & MODBUS port of the UR controller.
IP configuration
To allow communication between Pickit and the Universal Robots controller both must have an IP address in the same subnet.
By default, the Ethernet port on the Pickit processor labeled ROBOT is configured to have the following static IP address: 169.254.5.180 with a subnet mask of 255.255.0.0.
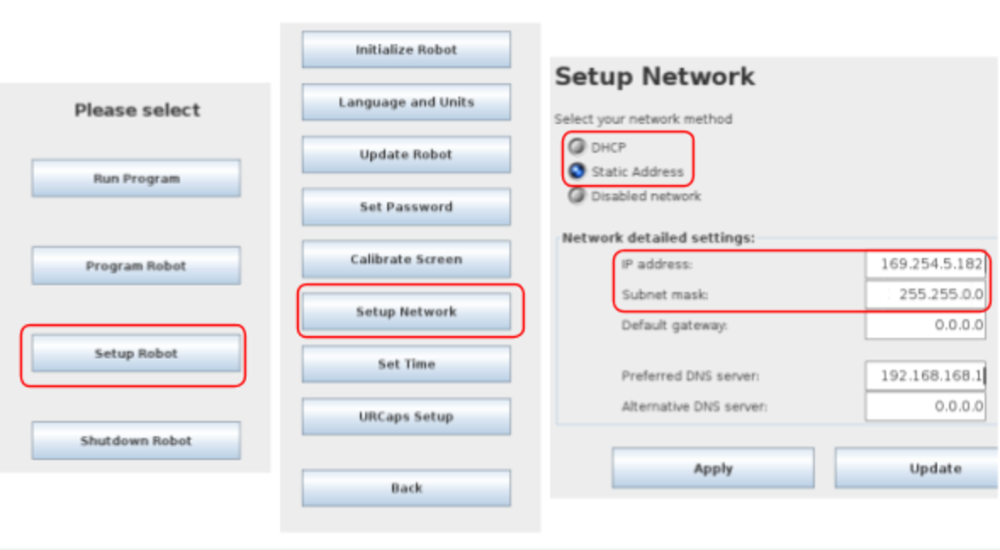
If this setting is kept, the following has to be done on the Universal Robots controller via Setup Robot > Setup Network:
Disable DHCP to obtain a static IP
Set the IP address of the robot to 169.254.5.182 which is an IP address in the same subnet as the Pickit IP
Set the subnet mask to 255.255.0.0;
Click Apply.
The IP address of the robot can not be the same as the IP address of Pickit.

Note
Default gateway and DNS servers can stay untouched.
Test robot connection
Details on testing this connection can be found on: Testing the Robot to Pickit connection.
Load the program files
Loading the program files for a Universal Robots consists of the following steps:
Download the right files
Once unpacked, the UR_Pickit folder contains the following files:
pickit_communication: This program is responsible for the low level communication between Pickit and the robot.pickit_functions: This program defines basic Pickit functions that allow taking Pickit actions via the robot controller.pickit_transformations: This program is responsible for computing the transform of the robot’s end-effector with respect to the reference frame.urmagic_upload_programs.sh: This program takes care of the automatic uploading of all Pickit related files to the UR controller.
The UR_Pickit folder also contains a few folders, each one corresponding to a different Polyscope software version, containing robot programs that use the mentioned ASCII files.
Warning
Modifying pickit_communication, pickit_functions or Pickit_transformations should only be considered after talking to a Pickit support engineer.
Upload the files to the robot
In order to upload these files onto the robot controller, a USB pendrive containing these files has to be used.
Copy all files inside the UR_Pickit folder to the root of the USB pendrive
Insert the USB pendrive into the USB port of the robot controller screen
A red “USB” sign appears in the interface, indicating that the upload is in progress. At this moment, all files with extension
.urp,.txt,.script,.installationand.variablesare copied to the /programs folder in the original subfolders.After the upload is complete, a green “USB” sign shows up.
Start and verify communication
Starting and verifying communication consists of 3 steps:
Start communication
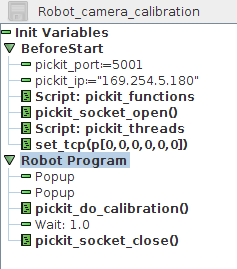
To start the communication, on the robot you have to select a Pickit example program which contains the Script instructions for Pickit in the BeforeStart section. You can see an example in the Robot_camera_calibration program:

Press Play on the Universal Robots interface, and communication will start. Communication will stop again once the current robot program stops.
Verify on the Pickit interface
To verify the data packages are received by Pickit: Check for the V icon next to ‘Robot’ in the top bar of the Pickit interface.
Test robot connection on Pickit
Details on testing this connection can be found on: Testing the Robot to Pickit connection