Warning
You are reading the documentation for an older Pickit release (3.1). Documentation for the latest release (4.1) can be found here.
Your first Pickit robot program
Once robot-camera calibration has been performed successfully, the next and final step is creating a robot program for vision-guided picking with Pickit.
On the Pickit web interface, click Enable Robot Mode on the top bar.
On the robot:
Pickit’s robot integration should be already installed, configured and running correctly.
Define the correct Tool Center Point (TCP) for the robot tool.
Open the example picking program supplied by Pickit, and customize the user inputs:
Set the Pickit configuration (setup and product files) to use.
For most robot integrations, this refers to numeric identifiers that you can read in the web interface next to the file name, in square brackets (for example, the number two in
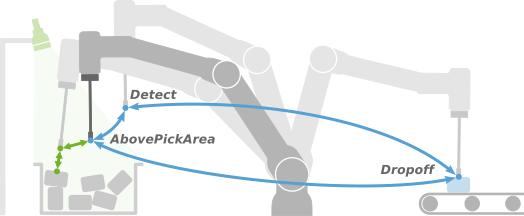
test_pickit [2]).Define the required fixed waypoints, like
Detect,DropoffandAbovePickArea.Add the robot tool logic for grasping and releasing an object.
Save changes as a new program.
Run the robot program.
Warning
The robot should be in manual mode, and with a low speed setting, so unexpected behavior can be identified early enough to prevent the robot from colliding with people or the environment.
Happy picking!
Now that you have successfully tested your Pickit system end-to end, from unboxing to robotic picking, it’s time to set up your application and have it ready to run in production. Please take a look at our section on optimizing your application to learn more!
Tip
You can learn more about the officially supported robot integrations in the ROBOT INTEGRATIONS section of this knowledge base (see panel at the left of the page), and in the robot integration video tutorial.