Warning
You are reading the documentation for an older Pickit release (2.0). Documentation for the latest release (4.1) can be found here.
Build a showcase demo with a M-camera and suction cup
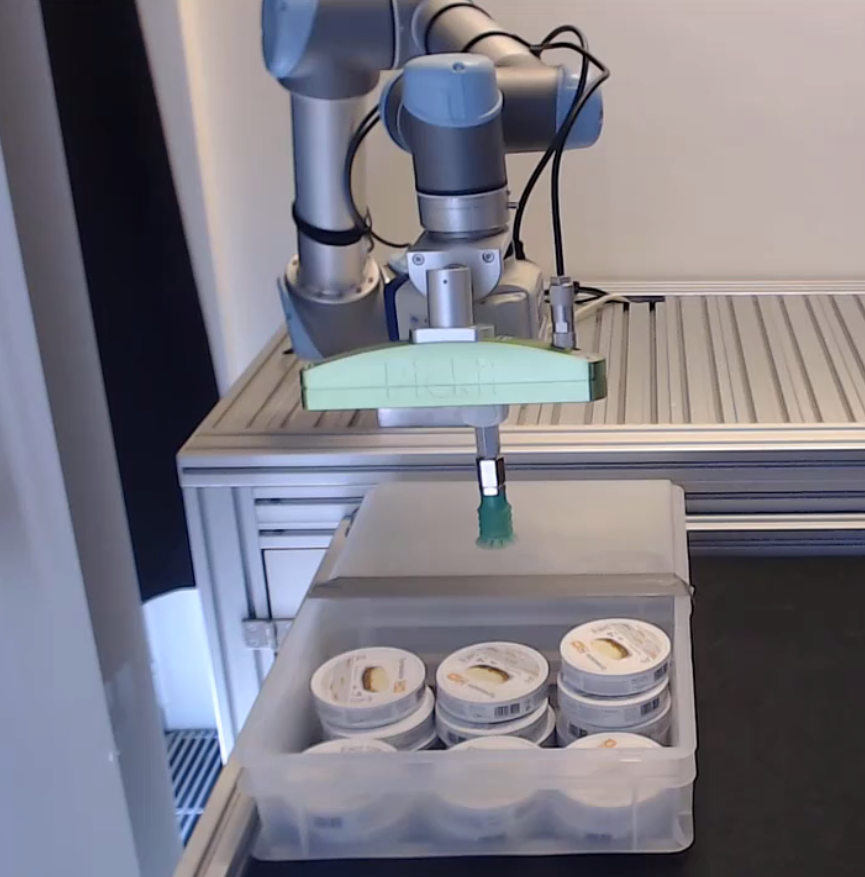
This article will guide you in setting up a simple showcase demo with Pick-it and a UR that you can show at trade fairs. For this demo a Pick-it M camera is used to detect round boxes of cheese in a bin. The parts are picked from the bin with a UR5 robot and a vacuum cup. A video of the end result can be seen below.
Requirements
The list below shows the different hardware that has been used to set up this demo.
Pick-it system with M camera
Mounting plate to mount camera on to the robot
UR5 robot
Stand to mount the robot on
Schmalz Vacuum gripper ECBPi 12 24V-DC M12-8, 15cm extended with vacuum cup SPB4f 40
Bin 400 x 300 x 120 mm
Round boxes of cheese ø110 mm and height 20mm
Stand of the same height of the bin to drop off the parts, in this demo a similar bin has been put upside down
Similar hardware can be used to set up a similar demo.
Mounting instructions
The robot is mounted on a stand.
The camera is mounted on the robot flange of the robot with the help of a mounting plate.
The vacuum gripper is mounted on the robot flange beneath the camera. The distance between the end effector of the vacuum and the mounted camera should be bigger than the depth of the bin. In the example the bin is 120mm deep and the distance between the end effector and camera is 150mm.
The bin is placed at a distance of 700mm(center of robot base to center of bin) and is placed 200mm lower than the robot.
The drop off stand is placed next to the bin in between the bin and the robot.
Setting up the Pick-it files
Here you can download a snapshot of the demo. In the snapshot you can see that the boxes are detected by using the Teach detection engine with a single model.
Setup file
For this demo the ROI box is set to similar dimensions as the real bin, the set ROI is slightly smaller and slightly higher. Last, the ROI box is attached to the Robot base frame. No other settings are used for this demo.
Need help to set these settings? See this article for more information: Region of Interest.
Product file
The product file that has been used can be copied from the snapshot mentioned above. Download the snapshot, upload it to your Pick-it system, open the snapshot on your Pick-it system and press Save these settings.
The model that is being used is the shape from the top, which is a circle. The pick frame of this model is put in the center of the circle. The matching score and tolerance is set to 90% and 1.5mm. No fusion or downsampling is applied and the detection speed is set to Fast.
Need help to set these settings? See this article for more information: Teach.
In the Picking tab the pick frames are enforced to XYZ||XYZ alignment. This setting makes sure that all calculated pick frames have the same orientation. So if one of the boxes is tilted it is still picked straight from the top. This is possible since the vacuum cup has quite some flexibility. Another benefit is that the head of the robot doesn’t need to turn so there are no problems with cable entanglement. To ensure that the robot will not try to pick boxes that are too tilted the maximum angle between pick frame Z-axis and surface normal is set to 30 degrees. No other settings in the picking tab are being used for this demo.
Need help to set these settings? See this article for more information: Picking.
Setting up the robot program
Here you can download the UR robot program. The idea of the program is to pick 3 boxes from the bin and drop these in a line. Once three boxes are picked they are pushed back in the bin. Then these steps are repeated.

Following still needs to be defined in this robot program:
Pick-it select command, the correct setup and product file need to be filled in.
Above_bin is a fixed waypoint on the center top of the bin. This intermediate waypoint is used to get in to and to get out of the bin.
In the picking sequence the vacuum needs to be set to active.
The dropping sequence uses a pallet function. Here the StartPos_1 and Endpos_1 are defined 280mm apart from each other. The Approach_1 and Exit_1 are the same and are defined 100mm above the PatternPoint_1. In this dropping sequence the vacuum is also turned off.
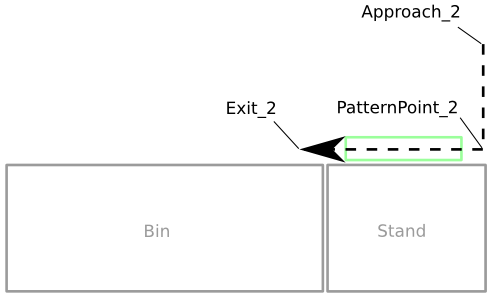
The pushing sequence pushes the boxes back into the bin. Here the StartPos_2 and Endpos_2 are also defined 280mm apart from each other. The Approach_2, PatternPoint_2 and Exit_2 waypoints are defined as shown below.
The detect_pose is a waypoint defined 700mm above the bin, this is also the starting position of the program.
Interaction with the running demo
This demo is robust and will keep on working continuously. After a while it could be that always the same 3 boxes are picked and pushed back in.
Interaction with the scene is possible when the robot just picked a box and is dropping it off. If the robot moves to the top of the bin to look for new objects the scene can’t be changed anymore.
Parts can be placed under angles. If the surface is tilted less than 30 degrees the robot will still pick them. If they are steeper than 30 degrees the parts can still be detected but will be labeled unpickable, due to the angle.