Warning
You are reading the documentation for an older Pickit release (3.3). Documentation for the latest release (4.1) can be found here.
Yaskawa example user frame program
This article describes the Yaskawa user frame program commonly used in surface treatment and dispensing applications. More information about the logic of user frame program can be found in the robot-independent user frame program.
Note
This program requires that Pickit is installed and set up with your robot. For installation instructions, please refer to the Yaskawa installation and setup article.
User frames in Yaskawa
This example uses the concept of a user frame.
In Yaskawa, user coordinates are used to implement the concept of user frames. Also, Yaskawa provides the concept of a relative job which can include the position data or points with respect to a certain frame. A relative job allows to translate a previously taught trajectory without extra calculation logic. Once the user teaches the trajectory of the relative job, taught point locations can be changed automatically by calling the job with an updated reference frame.
In this example program, the user frame is defined based on the pose variable P049 sent from Pickit (updated based on a detection).
Loading example programs
The user frame example for Yaskawa includes three job programs:
A standard job for teaching.
A standard job for execution.
A relative job, the inner process for defining and following trajectory points. It is called by the two previous standard jobs.
These example jobs can be found in JOB → SELECT JOB.
Teaching program: TEST_GUIDANCE_TEACHING
The job TEST_GUIDANCE_TEACHING.JBI is shown below.
This job follows the generic trajectory teaching logic.
 1NOP
 2'Check whether Pick-it is running
 3PI_RUN
 4MOVJ VJ=10.00  //Home pose.
 5'Load configurations.
 6'Make sure that the UFRAME #5 is
 7'defined before running this
 8'program. If not so, make a new
 9'user coordinates with number 5.
10PI_CFG SETUP:2 PRODUCT:2 U/FRAME:5 TOOL:1 TIMEOUT:20000
11'Initialize detection retries.
12SET B021 0
13MOVJ VJ=10.00  //Detect pose.
14MSG "Looking for objects"
15PI_LOOK
16PI_WAIT
17*LABEL
18IFTHEN I040=20
19	'Object was detected.
20	'Make user frame as object pose.
21	 MFRAME UF#(4) P049 BF
22	 TIMER T=0.50
23	'Call teaching relative job.
24	'Teach points of the trajectory
25	'while running relative job.
26	'Make sure the workpiece doesn't
27	'move until the end of teaching.
28	 CALL JOB:TEST_GUIDANCE_RELATIVE_JOB UF#(4)
29	 MSG "Trajectory teaching succeeded."
30ELSEIFEXP I040=23
31	 MSG "ROI is empty"
32	 JUMP *EMPTY
33ELSE
34	'No valid object. Detect again.
35	 INC B021
36	 IFTHENEXP B021>3
37		 MSG "No objects found after 3 tries"
38		 PI_SAVE
39		 JUMP *EMPTY
40	 ENDIF
41	 PI_LOOK
42	 PI_WAIT
43	 JUMP *LABEL
44ENDIF
45*EMPTY
46MOVJ VJ=10.00  //Home pose.
47END
The following is a breakdown of the trajectory teaching logic. Click on the entries below to expand them and learn more:
Lines 1-12: Initialization
 1NOP
 2'Check whether Pick-it is running
 3PI_RUN
 4MOVJ VJ=10.00  //Home pose.
 5'Load configurations.
 6'Make sure that the UFRAME #5 is
 7'defined before running this
 8'program. If not so, make a new
 9'user coordinates with number 5.
10PI_CFG SETUP:2 PRODUCT:2 U/FRAME:5 TOOL:1 TIMEOUT:20000
11'Initialize detection retries.
12SET B021 0
Firstly, check whether Pickit is running using the
PI_RUNmacro. Load the Pickit configuration using thePI_CFGmacro.Lines 13-16: Detection
13MOVJ VJ=10.00  //Detect pose.
14MSG "Looking for objects"
15PI_LOOK
16PI_WAIT
Go to the detect pose and find the object inside the ROI.
Lines 17-45: Teaching the trajectory
17*LABEL
18IFTHEN I040=20
19	'Object was detected.
20	'Make user frame as object pose.
21	 MFRAME UF#(4) P049 BF
22	 TIMER T=0.50
23	'Call teaching relative job.
24	'Teach points of the trajectory
25	'while running relative job.
26	'Make sure the workpiece doesn't
27	'move until the end of teaching.
28	 CALL JOB:TEST_GUIDANCE_RELATIVE_JOB UF#(4)
29	 MSG "Trajectory teaching succeeded."
30ELSEIFEXP I040=23
31	 MSG "ROI is empty"
32	 JUMP *EMPTY
33ELSE
34	'No valid object. Detect again.
35	 INC B021
36	 IFTHENEXP B021>3
37		 MSG "No objects found after 3 tries"
38		 PI_SAVE
39		 JUMP *EMPTY
40	 ENDIF
41	 PI_LOOK
42	 PI_WAIT
43	 JUMP *LABEL
44ENDIF
45*EMPTY
If the object is detected, get the object pose from
P049and set the user frame as the same value. Once the object is detected, call the relative job to teach trajectory with respect to current object pose frame. The actual trajectory teaching logic is located in theTEST_GUIDANCE_RELATIVE_JOB.JBI. While running the relative job, the user can teach the trajectory using the teach pendant.Lines 46-47: Termination
46MOVJ VJ=10.00  //Home pose.
47END
Go to the home pose.
Execution program: TEST_GUIDANCE_EXECUTION
The job TEST_GUIDANCE_EXECUTION.JBI is shown below.
This job follows the generic trajectory execution logic.
 1NOP
 2'Check whether Pick-it is running
 3PI_RUN
 4MOVJ VJ=10.00  //Home pose.
 5'Load configurations.
 6'Make sure that the UFRAME #5 is
 7'defined before running this
 8'program. If not so, make a new
 9'user coordinates with number 5.
10PI_CFG SETUP:2 PRODUCT:2 U/FRAME:5 TOOL:1 TIMEOUT:20000
11'Initialize detection retries.
12SET B021 0
13MOVJ VJ=10.00  //Detect pose.
14MSG "Looking for objects"
15PI_LOOK
16PI_WAIT
17*LABEL
18IFTHEN I040=20
19	'Object was detected.
20	'Make user frame as object pose.
21	 MFRAME UF#(4) P049 BF
22	 TIMER T=0.50
23	'Call taught relative job.
24	 CALL JOB:TEST_GUIDANCE_RELATIVE_JOB UF#(4)
25ELSEIFEXP I040=23
26	 MSG "ROI is empty"
27	 JUMP *EMPTY
28ELSE
29	'No valid object. Detect again.
30	 INC B021
31	 IFTHENEXP B021>3
32		 MSG "No objects found after 3 tries"
33		 PI_SAVE
34		 JUMP *EMPTY
35	 ENDIF
36	 PI_LOOK
37	 PI_WAIT
38	 JUMP *LABEL
39ENDIF
40*EMPTY
41MOVJ VJ=10.00  //Home pose.
42END
Except for not including teaching step during line 23-24, the logical process is same with the teaching program. Click on the entry below to expand it and learn more:
Lines 23-24: Following the taught trajectory
23	'Call taught relative job.
24	 CALL JOB:TEST_GUIDANCE_RELATIVE_JOB UF#(4)
Once the object is detected, call the relative job to follow the trajectory with respect to current object pose frame. The actual trajectory following logic is located in the
TEST_GUIDANCE_RELATIVE_JOB.JBI. Unlike the teaching logic, the user should not modify any pose value of the relative job.
Trajectory program: TEST_GUIDANCE_RELATIVE_JOB
The relative job TEST_GUIDANCE_RELATIVE_JOB.JBI is shown below.
This job includes the part for defining and following the trajectory points.
 1NOP
 2'Set teaching points for guidance
 3'when this job is called from
 4'teaching program.
 5'This relative job is with
 6'respect to the UFRAME #5.
 7'If you need more points
 8'copy the MOVL command and modify
 9'the pose.
10MOVJ VJ=80.00  //Teaching point1
11TIMER T=0.01
12MOVL V=80.0  //Teaching point2
13TIMER T=0.50
14MOVL V=80.0  //Teaching point3
15TIMER T=0.50
16MOVL V=80.0  //Teaching point4
17TIMER T=0.50
18MOVL V=80.0  //Teaching point5
19TIMER T=0.50
20END
This job should only be modified when it is called from the teaching job.
The user can add more trajectory points by copying and pasting the existing MOVL commands.
Use the teach pendant to teach the trajectory points.
For teaching the points:
Move the cursor to each point.
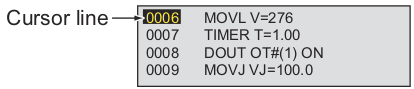
Note
The cursor should be located in the address part. A command line is separated with the left part for the address area and the right part for the instruction area. The user can move the cursor not only vertically but also horizontally between two areas. The cursor should be on the address area, as an image below.
Press the
SERVO ON READYbutton in the pendant.While holding the activate key, press the
MODIFY-ENTERbuttons sequentially.
Before running the program
Check user coordinates
For using the relative job, the user coordinates should be defined before running the job. Check the user coordinates number used for example is available. The example relative job uses the user coordinates 4. If that coordinates is not defined, the user should define the user coordinates 4. If that coordinates are already used in other programs, the user can define new user coordinates and change the number from example files by using the teach pendant.
Note
User coordinates for the relative job and Pickit configuration should be different.
Pickit configuration uses the user coordinates whose number is a parameter value from PI_CFG command or the default value, 5.
The relative job’s user coordinates number is defined in the job header.
This value should be same with the value used while calling the relative job in the teaching job and execution job.
Teach a home and detection pose
The teaching and execution programs require the home and detection poses to be defined. Set the desired location for these poses.
Set PI_CFG
In this command the input arguments have to be set.
See PI_CFG() for more information on how to do this.
But keep in mind that the tool number parameter of teaching program and execution program should be same.
Execute the user frame program
To run this program, either do Play + Start, Interlock + FWD or Interlock + Test.
Attention
Before running the robot program for the first time, make sure that:
There exists a valid robot-camera calibration.
The Tool Center Point (TCP) has been correctly specified.
The robot speed is set to a low value, so unexpected behavior can be identified early enough to prevent the robot from colliding with people or the environment.
Pickit is in robot mode, which is enabled in the Pickit web interface.