Warning
You are reading the documentation for an older Pickit release (2.1). Documentation for the latest release (4.1) can be found here.
The Pickit ROS interface
Connecting to Pickit using ROS
The Pickit system is running a ROS Master, which allows another system to connect to it using the ROS interfaces. Pickit exposes its ROS parameters, nodes and topics using standard ROS messages and a limited set of Pickit specific ROS messages.
Note
Since Pickit’s ROS master is always running on, it is recommended that the client system uses Pickit’s ROS master and does not start its own.
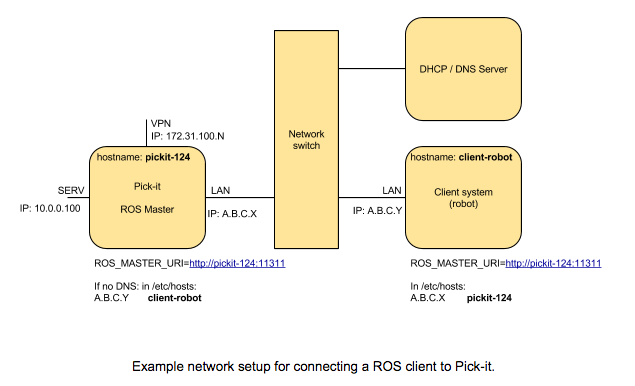
Connecting to Pickit ROS nodes requires you to define the Pickit hostname on the client system. Likewise, the client system’s name must be resolvable on the Pickit system. Preferably, the DNS Server of the client network resolves all hostnames to the LAN IP address of each host. If this is not possible, the host to IP mapping must be added to both Pickit’s and the client’s /etc/hosts.
The Pickit system is also running an ntp server. It can be used to make sure that the time between the client system and the Pickit system stays synchronised.
Connecting to the Pickit system
First verify that the Pickit system is reachable from your local system. Execute the following command in a terminal, replacing <pickit-pc> with the hostname of your Pickit system.
ping <pickit-pc>
The hostname of your Pickit system is shown on the top-left corner of the Pickit web interface, next to the Pickit logo. In the below example, it corresponds to pickit-demo-002.

If the ping test fails, please check the network configuration for your local system and make sure that it’s in the same network as the Pickit system.
Set your local system to use the ROS master of the Pickit system.
export ROS_MASTER_URI=http://<pickit-pc>:11311/
Set the ROS_IP environment variable to point to the IP of your local system.
export ROS_IP=<local-pc-ip>
To test communications, you first need to source a ROS workspace containing the
im_pickit_msgs package.
The package is available in our downloads page.
Refer to the catkin tools quickstart for details on how to build ROS packages and source ROS workspaces. Once the package has been built and its workspace has been sourced, run the following commands to verify connectivity with the Pickit system:
rostopic echo /pickit/heartbeat
If you see a stream of empty messages, then communication with the Pickit system has been established. Now run:
rostopic echo /pickit/status
which should produce output similar to the following:
state: root.Running.No_action
setup_file: setup_default.cpf
product_file: product_flex_example_cylinders.cpf
setup_changed: False
product_changed: False
If you instead get an error as shown below, it means that the current ROS workspace does not contain the im_pickit_msgs package.
ERROR: Cannot load message class for [im_pickit_msgs/PickitStatus]. Are your messages built?
Pickit ROS communication
The command-response mechanism
The Pickit ROS interface is based on using topics. Any connected robot or machine can give commands to Pickit by publishing a string command to the following topic:
/pickit/external_cmds
(type: std_msgs/String)
These commands will trigger Pickit to go into states responsible executing a specific task. The current state can at all times be monitored by subscribing to the following topic:
/pickit/status
(im_pickit_msgs/PickitStatus)
Object detections are published on a topic with a Pickit specific message type:
/pickit/objects_wrt_robot_frame
(type: im_pickit_msgs/ObjectArray)
Available commands
The following are valid strings that can be passed as payload to the /im/pickit/external_cmds topic:
e_look_for_object: Pickit performs one detection on the latest camera image.e_do_stop: Pickit leaves the continuous testing state.e_calibration_requested: Pickit looks for the robot camera calibration plate.
Changing the Pickit configuration
To change the active setup or product file, use the /load_config service. Product file change example from the command line:
rosservice call /load_config "config_type: 2
path: 'product_<productname>.cpf'
set_persistent: false"
Where config_type should be 1 for changing the setup file, and 2 for changing the product file. More details on the service request and reply arguments can be found in the im_pickit_msgs/srv/LoadConfig.srv file.
Publishing the robot pose
When using the Pickit ROS interface, Pickit requires the robot pose of the robot being published on the ROS topic /pickit/robot_pose. Robot pose in this context is the transform between robot base frame and robot end effector (without attached tool).
If you can lookup the above transform of your robot via tf, you can use the Python script below to continuously publish the robot pose to the mentioned ROS topic.
 1#!/usr/bin/env python
 2import rospy
 3import tf2_ros
 4import geometry_msgs.msg
 5
 6
 7if __name__ == "__main__":
 8    rospy.init_node('robot_pose_pub')
 9    tfBuffer = tf2_ros.Buffer()
10    listener = tf2_ros.TransformListener(tfBuffer)
11
12    # Make sure you provide the correct frame ids of your robot via the
13    # parameter server.
14    tf_base_link = rospy.get_param("~tf_base_link", "pickit/robot_base")
15    tf_ee_link = rospy.get_param("~tf_ee_link", "pickit/robot_ee")
16    publish_rate = rospy.get_param("~publish_rate", 10.0)
17    base_to_ee_pub = rospy.Publisher("/pickit/robot_pose",
18                                     geometry_msgs.msg.TransformStamped,
19                                     queue_size=10)
20
21    rate = rospy.Rate(publish_rate)
22    while not rospy.is_shutdown():
23        t = rospy.Time(0)
24        try:
25            trans_stamped = tfBuffer.lookup_transform(tf_base_link,
26                                                      tf_ee_link, t)
27
28        except (tf2_ros.LookupException, tf2_ros.ConnectivityException,
29                tf2_ros.ExtrapolationException):
30            rate.sleep()
31            continue
32
33        trans_stamped.header.frame_id = "pickit/robot_base"
34        trans_stamped.child_frame_id = "pickit/robot_ee"
35
36        base_to_ee_pub.publish(trans_stamped)
37        rate.sleep()
Camera URDF
You can retrieve the camera’s URDF from the ROS parameter server by issuing the following command:
rosparam get /camera/camera_description > pickit_camera.urdf
The mesh files of the camera can be fetched from the Pickit system under
http://<pickit-pc>/resources/camera/camera_description/meshes/camera_display.dae
http://<pickit-pc>/resources/camera/camera_description/meshes/camera_hull.dae
With camera URDF and meshes it should be straight forward to build your own camera_description package and/or to directly integrate it with your robot’s URDF. For more information on this topic see http://wiki.ros.org/urdf/Tutorials.
TF tree
Pickit uses two fixed robot frame names that are important for you if you want to connect your robot’s tf tree with Pickit’s tf tree. A simplified version of the Pickit tf tree for both camera fixed and camera on the robot looks like the following:
Camera fixed TF tree
pickit/robot_ee
       ^
       |
       |
       +              robot-camera-calibration
pickit/robot_base +------------------------------> camera/camera_link
Camera on robot TF tree
                   robot-camera-calibration
pickit/robot_ee  +------------------------------> camera/camera_link
       ^
       |
       |
       +
pickit/robot_base
Connecting your robot’s tf tree
Camera fixed
For the camera fixed case this is fairly simple by publishing a static identity transform between your robot’s base frame (e.g. base_link) and pickit/robot_base. This can be done with tf2’s static transform publisher. In a ROS launch file this could look like the following:
<!-- Publish a static transform (identity) between base_link and
    pickit/robot_base to connect both tf tree. -->
<node name="static_tf_brdc_pickit_robot" type="static_transform_publisher"
      args="0 0 0 0 0 0 base_link pickit/robot_base" pkg="tf2_ros" />
Camera on robot
This is similar to the camera fixed case with the addition that you also have to publish an identity transform between your robot’s end-effector frame (without attached tool) and pickit/robot_ee.
Note
It is currently not possible to disable the broadcasting of the tf transform between pickit/robot_base and pickit/robot_ee. This will cause tf loops if you connect both frames with your corresponding robot frames. Disabling the tf broadcasting will be possible in future releases, contact us if this is a requirement for you and we will see what we can do.
A possible workaround for the tf loop issue would be to run a ROS node that filters the /tf topic by removing the above mentioned transform. The filtered result could then be published to another topic e.g. /tf_filtered. You would then have to remap from /tf to /tf_filtered for all your nodes (that listen to tf) e.g. like this:
rosrun rviz rviz /tf:=/tf_filtered
An example script that could to the filtering of the /tf topic could look like this:
 1#!/usr/bin/env python
 2import rospy
 3import tf.msg
 4
 5tf_pub = None
 6
 7
 8def tf_message_cb(msg):
 9    global tf_pub
10    msg.transforms = filter(lambda x: x.child_frame_id != "pickit/robot_ee" and
11                                      x.header.frame_id != "pickit/robot_base",
12                            msg.transforms)
13   tf_pub.publish(msg)
14
15
16if __name__ == '__main__':
17    rospy.init_node("tf_filter")
18    tf_pub = rospy.Publisher('/tf_filtered', tf.msg.tfMessage, queue_size=10)
19    tf_sub = rospy.Subscriber('/tf', tf.msg.tfMessage, tf_message_cb)
20    rospy.spin()
Robot camera calibration
Doing a robot camera calibration is not (yet) straightforward with the ROS interface. You need to publish certain commands to the /pickit/external_cmds topic and optionally listen to the /pickit/status or /pickit/status_calib topic to get feedback.
Single pose calibration
Go to the web interface and setup the calibration for single pose .
Publish the string command
e_calibration_requestedon the/pickit/external_cmdstopic.Save the calibration in the setup file (through web interface or
/save_setupservice).
Multi poses calibration
Go to the web interface and setup the calibration for multi poses .
Move your robot to at least 5 different poses and for every pose publish the string command
e_calibration_requestedon the/pickit/external_cmdstopic. Make sure to wait a couple of seconds (~10s) before moving to the next pose. Alternatively you can listen to the/pickit/status_calibtopic to get notified when Pickit has processed the new calibration pose.Publish the string command
e_do_calculate_calibrationon the/pickit/external_cmdstopic.Save the calibration in the setup file (through web interface or
/save_setupservice).
Topics of interest
Topic name |
Description |
|---|---|
|
Raw calibrated point cloud. |
|
Transformation between the camera’s optical frame and the Pickit reference frame in which the ROI box is given in. This transformation is updated while the robot moves in case the camera is mounted on the robot and the Pickit reference frame is fixed to the robot’s base frame. |
|
Point cloud of the currently active Pickit Teach model. |
|
Point cloud used by Pickit for object detection. It only contains points belonging to the Region of Interest. |
|
List of available setup and product files. |
|
Boolean value indicating whether a detection is ongoing. True when a detection is ongoing. |
|
List of detected objects given in the Pickit reference frame. The message also includes the camera pose with respect to the robot base, the camera to Pickit reference frame transform (same content of |
|
Same as |
|
Transform between the robot and the camera’s optical frame. The robot frame depends on the camera mount and is either the robot base ( |
|
Boolean indicating whether the robot is sending pose updates to the Pickit system. |
|
The transformation between the robot base and robot flange as sent by the robot. |
|
Status information of the Pickit system. Includes the state as well as the currently loaded setup and product file. |
|
Camera image corresponding to the 2D view in the Pickit web interface. |
The ROS message type of a given topic can be queried from the command
line with the rostopic info command, and the message payload can be
queried with the rossmg show command, for instance:
$ rostopic info /pickit/objects_wrt_robot_frame
Type: im_pickit_msgs/ObjectArray
Publishers:
...
Subscribers:
...

$ rosmsg show im_pickit_msgs/ObjectArray
<message definition>