Warning
You are reading the documentation for an older Pickit release (2.4). Documentation for the latest release (4.1) can be found here.
Simple pick and place program
Overview
This article describes the logic for a simple vision-guided pick and place robot program. The program continuously picks objects from a detection region and places them in a specified drop-off location until no more pickable objects are found.
The logic has the purpose of presenting the basic ideas for writing a good pick and place robot program. It is written in robot-independent pseudo-code using a syntax similar to that of Python.
Note
This article is ideal for understanding the basics of vision-guided pick and place, but it omits some useful functionality for the sake of clarity. The Complete pick and place program is a slightly more complex version that can serve as a great starting point to build real applications on. A complete description of the Pickit interface can be found here.
The code samples presented in this article are pseudo-code, and are not meant to be executed.
The program can be downloaded here and consists of two main parts:
Generic pick and place logic, which typically remains constant across applications.
Application-specific hooks that depend on things like the robot, the gripper, the part to pick and the cell layout.
The minimum inputs required to run the pick and place program are:
Pickit configuration: setup and product IDs to use for object detection.
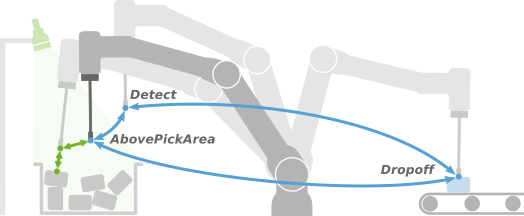
Waypoints:
DetectWhere to perform object detection from. Refer to this article for guidelines on how to make a good choice.DropoffWhere to place objects.AbovePickAreaA point roughly above the pick area from which the above two can be reached without collision. In simple scenarios, it can be the same asDetect.
Robot tool actions:
gripper_grasp()andgripper_release(), to grasp and release an object, respectively.
Generic pick and place logic
 1if not pickit_is_running():
 2    print("Pickit is not in robot mode. Please enable it in the web interface.")
 3    halt()
 4
 5before_start()
 6pickit_configure(setup, product)
 7
 8retries = 5  # Number of detection retries before bailing out.
 9goto_detection()
10pickit_find_objects_with_retries(retries)
11pickit_get_result()
12
13while True:
14    if not pickit_object_found():
15        # There are no pickable objects, bail out.
16        break
17
18    # Compute pre-pick and post-pick points.
19    PrePick = compute_pre_pick(PickitPick)
20    PostPick = compute_post_pick(PickitPick)
21
22    if pickit_is_reachable(PickitPick, PrePick, PostPick):
23        # Object is pickable!
24        pick()
25        goto_detection()
26        pickit_find_objects_with_retries(retries)
27        place()  # In parallel to detection, saves cycle time.
28        pickit_get_result()
29    else:
30        # Object is unreachable, get the next detection, if any.
31        pickit_next_object()
32        pickit_get_result()
33
34after_end()
Lines where application-specific hooks are called are highlighted above. The following is a breakdown of the pick and place logic along with a flowchart illustrating it. Click on the entries below to expand them and learn more:
Lines 1-6: Initialization
1if not pickit_is_running():
2    print("Pickit is not in robot mode. Please enable it in the web interface.")
3    halt()
4
5before_start()
6pickit_configure(setup, product)
These commands are run once before starting to pick and place. They take care of:
Checking if Pickit is in robot mode, and bail out if not. Pickit only accepts robot requests when in robot mode.
Calling the before_start() hook, which contains application-specific initialization logic.
Loading the Pickit configuration (setup and product) to use for object detection.
Lines 8-11: First detection
 8retries = 5  # Number of detection retries before bailing out.
 9goto_detection()
10pickit_find_objects_with_retries(retries)
11pickit_get_result()
The first object detection consists of:
goto_detection() hook, which brings the robot to a configuration from which object detection can take place.
pickit_find_objects_with_retries(retries) will trigger object detection with retries.
pickit_get_result() waits for Pickit to reply with detection results.
Lines 13-32: Pick and place loop
13while True:
14    if not pickit_object_found():
15        # There are no pickable objects, bail out.
16        break
17
18    # Compute pre-pick and post-pick points.
19    PrePick = compute_pre_pick(PickitPick)
20    PostPick = compute_post_pick(PickitPick)
21
22    if pickit_is_reachable(PickitPick, PrePick, PostPick):
23        # Object is pickable!
24        pick()
25        goto_detection()
26        pickit_find_objects_with_retries(retries)
27        place()  # In parallel to detection, saves cycle time.
28        pickit_get_result()
29    else:
30        # Object is unreachable, get the next detection, if any.
31        pickit_next_object()
32        pickit_get_result()
The pick and place loop executes until there are no more objects to pick. The following cases are handled:
There are no pickable objects: Exit the pick and place loop, as either there are no detected objects or they are all unreachable.
The object is detected and reachable (i.e. pickable): Execute pick and place and trigger the next object detection.
The object is detected but not reachable: Get the next object from the last detection run. A single run can yield multiple object detections, and pickit_next_object() allows to access the next object, if any, without incurring the overhead of running a new detection.
Note
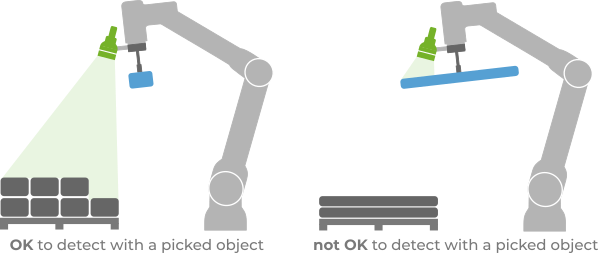
To save cycle time when executing pick and place, note that object detection is triggered after the pick() hook, such that it takes place in parallel to place(). This optimization is desirable in almost every application. An exception would be when the camera is robot-mounted and the picked object is large enough to block the camera view, as shown below. To disable it, move the call to place() two line above, such that it takes place after pick().
Line 34: Termination
34after_end()
The after_end() hook is called last, which contains application-specific termination logic.
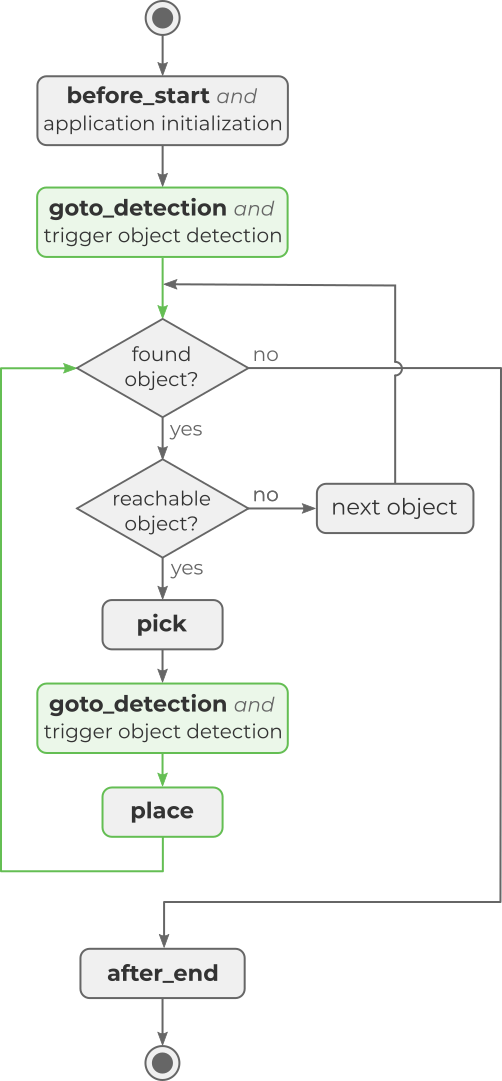
Flowchart
Application-specific hooks
The contents of these hooks are typically specific to a particular application, as they contain motion sequences and logic that depend on the robot cell layout, including:
The robot type and location
The camera mount and location
The parts to pick
The gripper to use
The pick and place locations
The following implementations are a good starting point for a general-purpose pick and place application, but it’s typically necessary to adapt them to some extent by adding waypoints or extra logic. A detailed description of these hooks can be found in the Complete pick and place program article.
36# Action performed once before starting pick and place.
37def before_start():
38    gripper_release()
39
40# Move the robot to the point from which object detection is triggered.
41def goto_detection():
42    movej(Detect)
43
44# PrePick is parallel to the object's z-axis, i.e. it tilts with the object.
45# The optional offset parameter is in millimeters.
46def compute_pre_pick(PickitPick, pre_pick_offset=100):
47    PrePick = PickitPick * Pose(0, 0, -pre_pick_offset, 0, 0, 0)
48    return PrePick
49
50# PostPick is along the robot base z-axis, which typically means straight-up.
51# The optional offset parameter is in millimeters.
52def compute_post_pick(PickitPick, post_pick_offset=100):
53    PostPick = PickitPick
54    PostPick.z = PostPick.z + post_pick_offset
55    return PostPick
56
57# Sequence for performing the picking motion:
58# - Starts and ends at AbovePickArea, a point reachable in a collision-free way.
59# - PrePick --> PickitPick: Linear approach to the pick point.
60# - A grasping action.
61# - PickitPick --> PostPick: Linear retreat away from the pick point.
62def pick():
63    movej(AbovePickArea)
64    movel(PrePick)
65    movel(PickitPick)
66    gripper_grasp()  # For a suction-like gripper, do this one line above.
67    movel(PostPick)
68    movel(AbovePickArea)
69
70# Sequence for placing the object at the specified dropof location.
71def place():
72    movej(Dropoff)
73    gripper_release()
74
75# Action performed once after pick and place has finished.
76def after_end():
77    if not pickit_object_found():
78        if pickit_empty_roi():
79            print("The ROI is empty.")
80        elif pickit_no_image_captured():
81            print("Failed to capture a camera image.")
82        else:
83            print("The ROI is not empty, but the requested object was not found or is unreachable.")