Warning
You are reading the documentation for an older Pickit release (3.0). Documentation for the latest release (4.1) can be found here.
Quantitative calibration validation
This article describes how to quantitatively validate the correctness of the active camera’s current calibration. The procedure can be performed as a sanity check just after calibrating, or at any future moment, especially if you suspect that the camera might have moved relative to the robot. It consists in performing one or more additional calibration plate detections, and computing for each detection the error with respect to the value stored during the last successful calibration.
Tip
The robot-camera calibration error might not be constant across the field of view. It is therefore recommended to validate the calibration as described in this article inside the Region of Interest (ROI) of the application, where picking is meant to take place.
Requirements
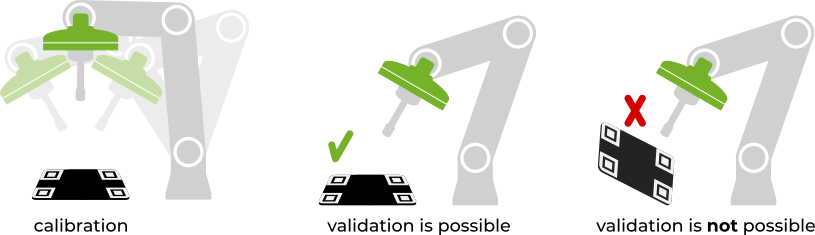
Calibration validation requires a successful calibration to exist for the active camera. It also imposes a constraint on the placement of the calibration plate with respect to the robot, which depends on the camera mount:
Fixed camera: The plate location with respect to the robot flange should be the exactly the same as when calibration ran.
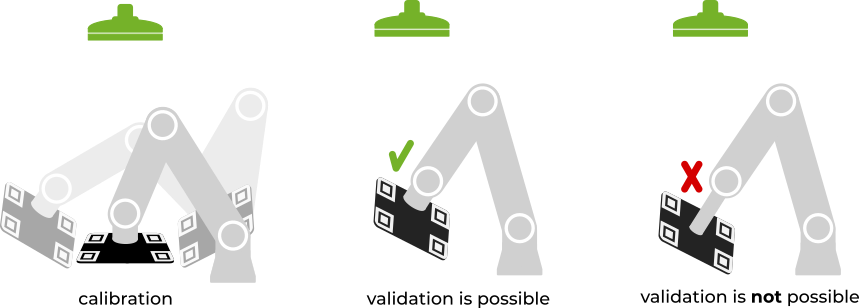
Robot-mounted camera: The plate location with respect to the robot base should be the exactly the same as when calibration ran.
If you are validating just after running calibration, this contraint should not be an issue, but you might want to perform validation regularly over time, days, weeks or months after the last successful calibration. When this is the case, it is recommended to:
Fixed camera: Use a (manual or automatic) tool changer, and have the calibration plate rigidly attached to one of the tool ends. It’s important that the tool changer is such that the mounted tool is subject to neglectable mounting errors.
Robot-mounted camera: Rigidly fix the calibration plate to a wall or other structure in the work cell. When performing validation, the plate should be at a distance to the camera similar to the distance at which parts are expected to be picked.
Validation from the web interface
If you perform calibration validation once or infrequently, it can be conveniently done from the Pickit web interface.
Just after calibration
When performing calibration, the last step of the calibration wizard allows to validate the results that were just computed. The procedure is as follows:
Bring the robot to a pose where the calibration plate is visible to the camera. We recommend using a different pose than those used to during the last calibration run.
Click the Validate now button.
Check the validation results. The reported error represents the expected picking error for a part being detected at the location of the calibration plate.
If validation was successful, the current calibration can be used for picking. If not, it’s recommended to peform calibration again and validate the new results.
At any future moment
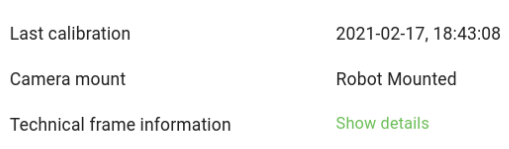
To inspect the details of the existing calibration, click the Calibration button on the top bar of the Pickit web interface. You will be presented with a summary of the last calibration associated to the active camera. If no calibration has been ever performed, it will also be indicated.
By clicking the the Validate calibration button at the bottom of the page, you can perform the validation procedure described in the previous section.
Validating from the robot program
If you perform calibration validation often, it’s possible to run validation autonomously from the robot, without using the Pickit web interface. This might be relevant for applications where robustness is paramount, where a validation check is performed before every production run, or at regular time intervals. If the validation check fails, this feature can be used in combination with calibration from robot to automatically re-run calibration.
Refer to the example validation program, and the documentation of your robot integration to learn more.
Invalid robot-camera calibration?
If the outcome of calibration validation is that the current calibration is invalid, the most likely cause is that the camera moved with respect to the robot base (fixed camera) or robot flange (camera on robot). When this is the case, robot-camera calibration needs to be performed again.
If the camera has not moved with respect to the robot, it could be that something went unexpectedly wrong during calibration. The following pointers can help you identify the cause:
The calibration plate moved during the calibration process.
The camera mount (fixed or robot-mounted) was incorrectly selected in the calibration wizard.
For multi poses calibration, the calibration poses don’t comply with the recommendations.
For single pose calibration, the helper transformation is incorrect.
If you are integrating a new robot brand with Pickit, there might be an incompatability in the way poses are communicated between Pickit and the robot.
Note
If you are having trouble with robot-camera calibration, contact our support team by sending an email to support@pickit3d.com.