Warning
You are reading the documentation for an older Pickit release (3.0). Documentation for the latest release (4.1) can be found here.
Your first detection
Now that all connections are tested we can start our first detection. For this we’ll use a soda can. Note that this is the final step of this quick start guide that can be completed without having a robot. Follow the steps below to do your first detection with Pickit:
Make sure that the Pickit camera is mounted approximately 700 mm above a flat workspace. The workspace is now seen in the 2D view on the Pickit web interface.
In the Pickit web interface press Disable Robot Mode.
Create a new setup: in the Setup tab, on top, click + New and name the new setup file
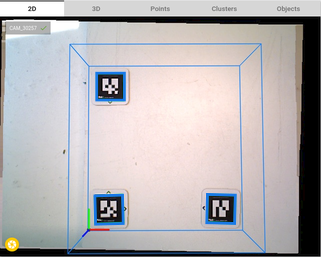
test_pickit. Press Create.Place the three workspace markers, according the indicated arrows, inside the field of view of the camera.
Go to the Build ROI box section and press Around QR markers. This button is only enabled if all three Region of Interest markers are visible. Wait until the blue box is updated.
Press the Save button on top of the Setup tab.
Create a new product: in the Product tab, on top, click + New and name the new product file
test_pickit. Press Create.In the Detection tab:
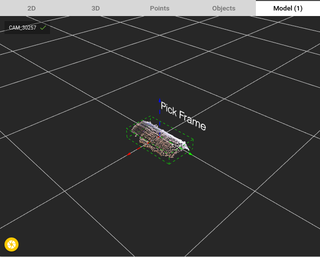
Place a soda can on its side in the middle of the ROI.
In Define models, select Teach from camera. Now a point cloud of the soda can is shown in the right side of the page.
In the Picking tab:
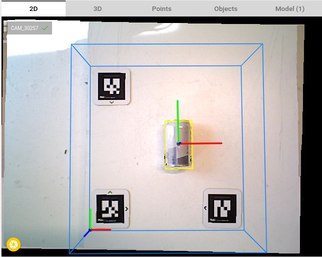
In Define pick points, select Add pick point.
Place the newly added point in the top surface of the can.
You can do this by expanding the pick point, checking``Enabling drag handles in 3D viewer`` and interactively move it to the desired location in the 3D view.
Press the Save button on top of the Detection or Picking tabs.
Go back to the 2D view and press Detect. A pick point (red-green-blue arrows) appears above the soda can.
Place the soda can somewhere else in between the markers and press Detect again.
Congratulations for your first detection!
Tip
You can learn more about the possibilities of Pickit in these video tutorials: