Warning
You are reading the documentation for an older Pickit release (4.0). Documentation for the latest release (4.1) can be found here.
Network settings
Pickit processors differ in the number and type of Ethernet ports available, but their port roles and settings follow common principles. This article describes the functions, availble across processors, and configuration options of each single port.
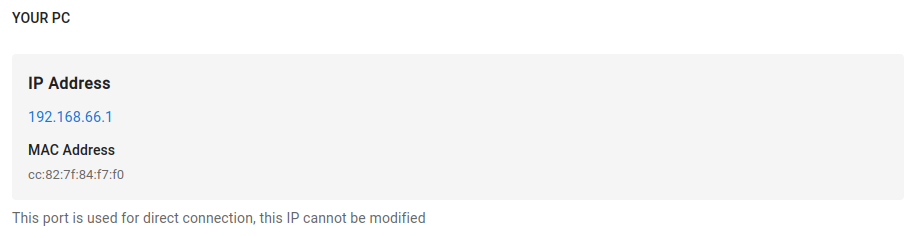
Pickit port labeled YOUR PC
This port is used for a direct connection between your computer and the Pickit processor and its settings cannot be modified.
For the Pickit processor 3.0a, a switch is used for connecting multiple components (YOUR PC and CAMERA) to a single processor Ethernet port.
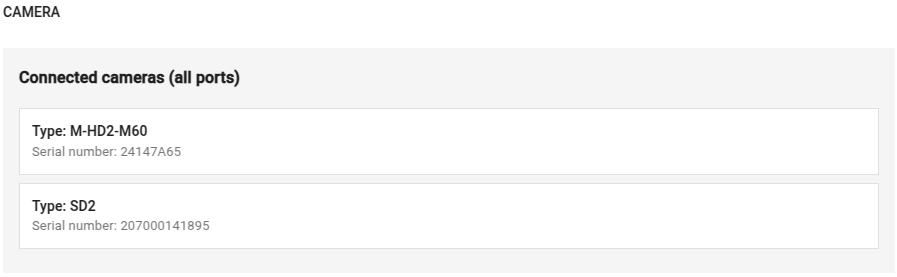
Pickit port labeled CAMERA
This port is used for connecting a camera to the Pickit processor, and its settings cannot be modified.
For the Pickit processor 3.0a:
A switch is used for connecting multiple components which live on the same physical interface (YOUR PC and CAMERA) to a single processor Ethernet port.
This switch provides Power over Ethernet (PoE) for cameras that require it and allows for multi-camera support (learn more).
For Pickit processors 4.0a and 4.0b:
The CAMERA port has PoE, for cameras that require it.
There are additional ports that can be configured for camera connection, for multi-camera support. Learn more in the Pickit ports labeled PORT section below.
The web interface lists all cameras connected to the processor.
Pickit port labeled ROBOT
This port has the purpose of connecting your Pickit processor to your robot.
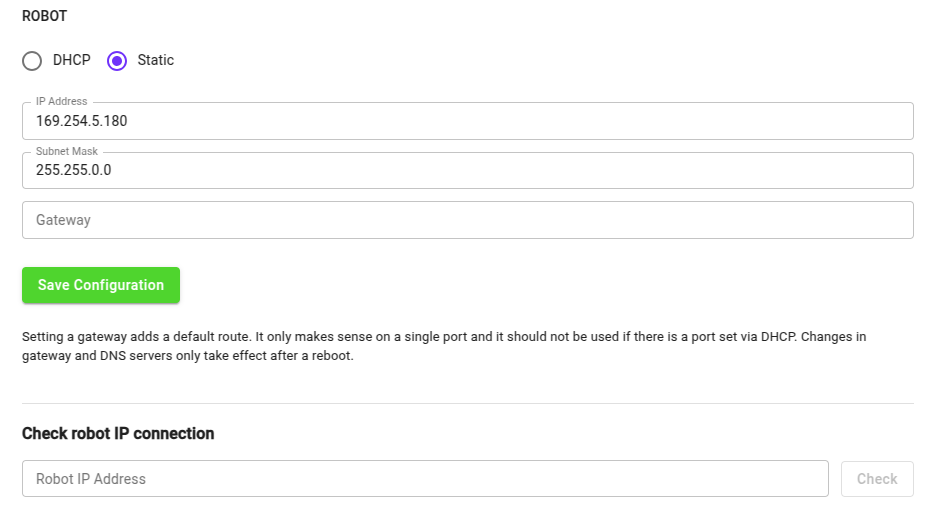
By default, this port is set to Static, which means it’s using a fixed IP configuration. You can set the following IP Configuration options:
IP Address (Default value: 169.254.5.180)
Subnet mask (Default value: 255.255.0.0)
Gateway
If you prefer to get an IP Address from a DHCP server, you set this port to DHCP.
Warning
To avoid connectivity issues, make sure that this IP address (static or DHCP) does not overlap with either a LAN IP configuration or with any of the internal network configurations of the Pickit system, i.e. 192.168.66.0/24 and 172.31.0.0/16.
Testing the Robot to Pickit connection
You can check if the IP address of the robot or PLC is reachable from the Pickit processor by entering its IP address in the Robot IP field and clicking Check.
A message indicating failure or success will be displayed below the button.

Note
In case of failure, check if the cables are properly connected and whether the IP assigned to the robot during its IP configuration step matches the tested one.
Pickit LAN Configuration
This configuration has the purpose of connecting your Pickit processor to a network, for two main purposes:
Monitor multiple Pickit systems or robot cell components from a single station.
Bring the system temporarily online for remote support (learn more).
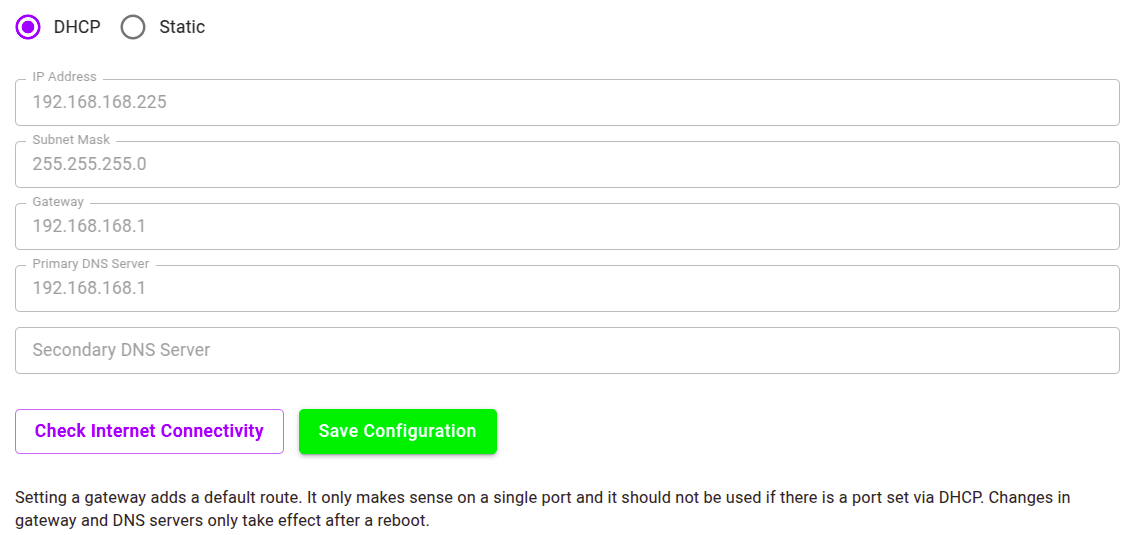
For Pickit processors 4.0a and 4.0b, Port 1 is configured by default as a DHCP LAN port. Learn more in the Pickit ports labeled PORT section below for how to configure other ports as LAN.
Warning
To avoid connectivity issues, make sure that this IP address (static or DHCP) does not overlap with either a LAN IP configuration or with any of the internal network configurations of the Pickit system, i.e. 192.168.66.0/24 and 172.31.0.0/16.
If you prefer to set a Static IP, you can set the following IP Configuration options:
IP Address
Subnet mask
Gateway
DNS server (primary and secondary)
If this port is used for online remote support, test connectivity with the Pickit servers by clicking the Check Internet Connectivity button.
Note
When accessing the Pickit system using the LAN port, you may have to configure your firewall. Pickit requires the following ports to be reachable:
External computer (web interface): 80, 8080, 8083, 8182, 9999.
Robot: 5001 or 30001.
Pickit ports labeled PORT
Pickit processors 4.0a and 4.0b feature additional ports that can be configured either as CAMERA or LAN ports.
By default, Port 1 is configured as LAN port, while the other PORTs are configured as CAMERA.
Any of these ports can be reconfigured to be used as either CAMERA or LAN port in the following manner:
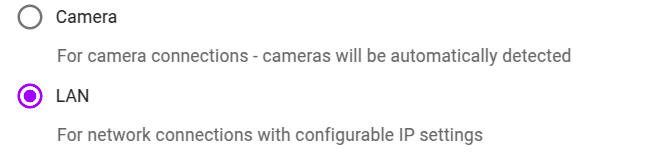
By choosing one option and click on Save Configuration.
Refer to the respective sections for details on CAMERA or LAN ports.