Warning
You are reading the documentation for an older Pickit release (2.1). Documentation for the latest release (4.1) can be found here.
Explaining the Teach detection parameters
The Pickit Teach detection engine is designed to detect complex 3D shapes. This article explains its detection parameters.
M-HD preset (M-HD camera only)
The M-HD preset settings are explained in M-HD preset (M-HD camera only).
Define your model(s)
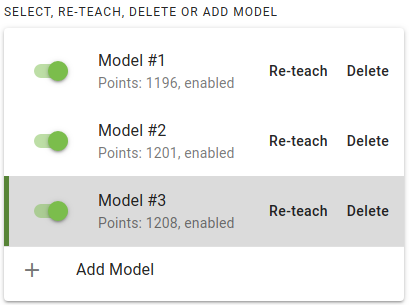
A list of thaught models is shown accompanied by their ID and the number of points. By default, there are no models defined.
Add a model
Press Add a model to teach your first model, the points currently visible within the ROI are now saved into a model. When the model is successfully created, the model will automatically be shown in the Model view.
In one product file up to 8 different models can be taught. This means that Pickit Teach is capable of looking for 8 different shapes in one detection. See How to make a robot program with multiple models on how you can use the model ID in a robot program.
Re-teach a model
You can always re-teach a model by pressing Re-teach for a specific model. By pressing this button, the points currently visible within the ROI are saved into the model.
Warning
When re-teaching a specific model, the point-cloud data from the previous model is overwritten. This action cannot be undone.
It is also possible to crop or expand an existing model, without the need to re-teach it. Refer to the article How to edit an existing Pickit Teach model for further details.
Delete a model
To delete a model, press Delete for the specific model. The action needs to be confirmed in a popup.
Warning
Model ID’s will be reassigned after deleting a model. If you use model ID’s in your robot program, make sure they’re up to date after deleting models.
Warning
Model data will be lost after deletion confirmation and cannot be restored.
Select and visualize a model
A model can be selected by clicking on the respective table row. When the model is loaded, it will automatically be shown in the Model view.
Enable or disable a model
A model is enabled by default, and can be disabled through the toggle switch at the left of the respective table row. If a model is disabled, it will be ignored in subsequent detection runs. Disabling models is a quick and useful way to check the effect of different combinations of models, or to test distinct models in isolation (by disabling all others).
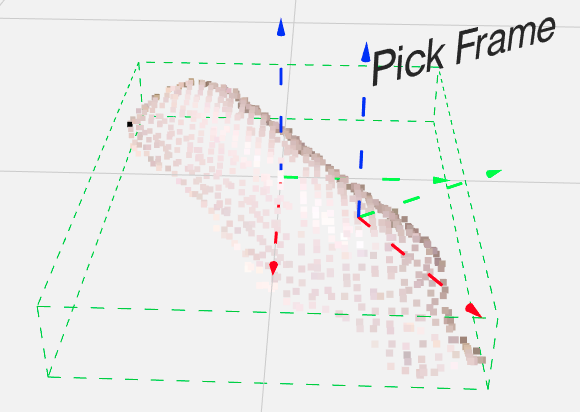
Pick frame
The pick frame is the location where the Tool Center Point (TCP) of the robot will be guided to. The location of the pick frame can be visualized from the Model view. By default, Pickit Teach provides an initial pick frame, but this will in general not be the best choice. It’s possible to specify the desired pick frame as a positional and rotational offset with respect to the object model. The following article goes more into depth on How to define a good pick frame.
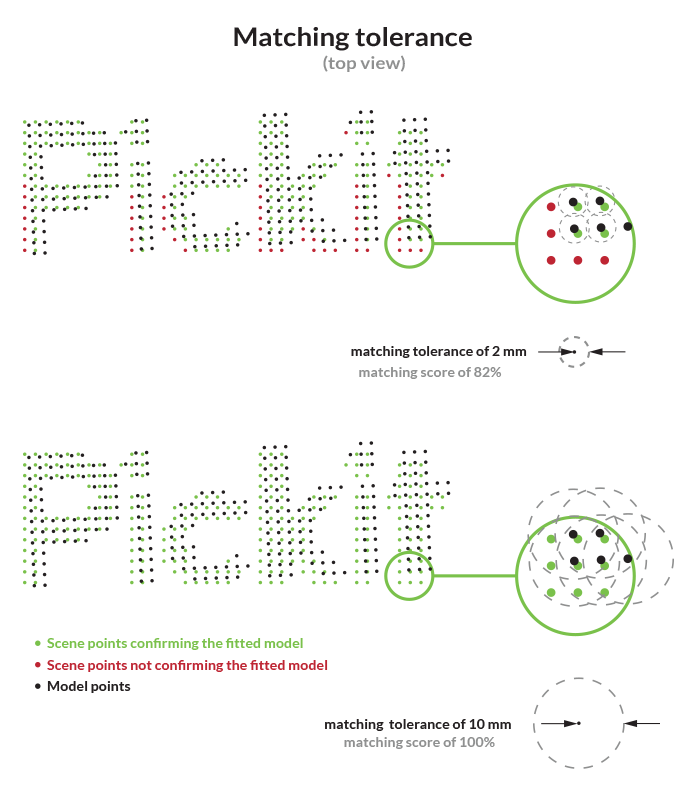
Matching tolerance
If the distance between a detected scene point and a point of your model is below this position tolerance value, then this scene point will confirm the model point. This parameter has a big impact on the scoring of the Minimum matching score.
The following guide will help you find a good value for this parameter, How to set good model matching parameters.
Minimum matching score
Minimum percentage of model points that need to be confirmed by scene points, for the detected object to be considered valid.
The following guide will help you find a good value for this parameter, How to set good model matching parameters.
Optimize detections
Image fusion and scene downsampling resolution
Image fusion (applicable for the M and L cameras only) and scene downsampling resolution are explained in Optimize detections.
Detection speed
With this parameter, you can specify how hard Pickit Teach tries to find multiple matches. Slower detection speeds are likely to produce more matches. There are three available options:
Fast Recommended for simple scenes with a single or few objects.
Normal This is the default choice and represents a good compromise between a number of matches and detection speed.
Slow Recommended for scenes with many parts, potentially overlapping and in clutter.
Example: Two-step bin picking.
Pick an individual part from a bin using Normal or Slow detection speed and place it on a flat surface.
Perform an orientation check for re-grasping using Fast detection speed, as the part is isolated. Grasp and place in final location.
Detection precision
Apart from the above choice, you can instruct Pickit Teach to favor being more precise or to potentially find more objects. This choice has a negligible impact on detection times. In most cases, selecting more precise yields a good number of matches per detection run, and is the recommended default.