KUKA installation and setup
The Pickit integration for KR C4 and KR C5 (KSS 8.7) controllers is a set of KRL files that communicate with the Pickit processor over TCP/IP, using the KUKA EthernetKRL option. Pickit acts as the server on port 5001, the robot controller connects to it as a client. This page describes how to install and set up the integration on the robot controller.
Attention
If you are looking for information about the old integration based on the KUKA Connect KRC module, go to the 4.0 documentation.
Attention
If the robot currently runs the older KUKA-Pickit integration based on the KUKA Connect KRC module, first follow Migrating from a Connect KRC installation. The two integrations cannot coexist.
Compatibility and requirements
Robot controller |
KR C4, KR C5 |
KUKA System Software |
KSS 8.3 to 8.7 (KSS 9.x and iiQKA.OS2 are not yet supported) |
EthernetKRL |
2.2 to 3.2 |
Pickit |
3.4 or newer (for Protocol 12) |
Before starting the installation, make sure that:
The EthernetKRL module is installed and licensed on the controller. This is a KUKA software option, which can be acquired via my.KUKA.
You can log on to the smartPAD as Expert.
Verify that EthernetKRL is installed
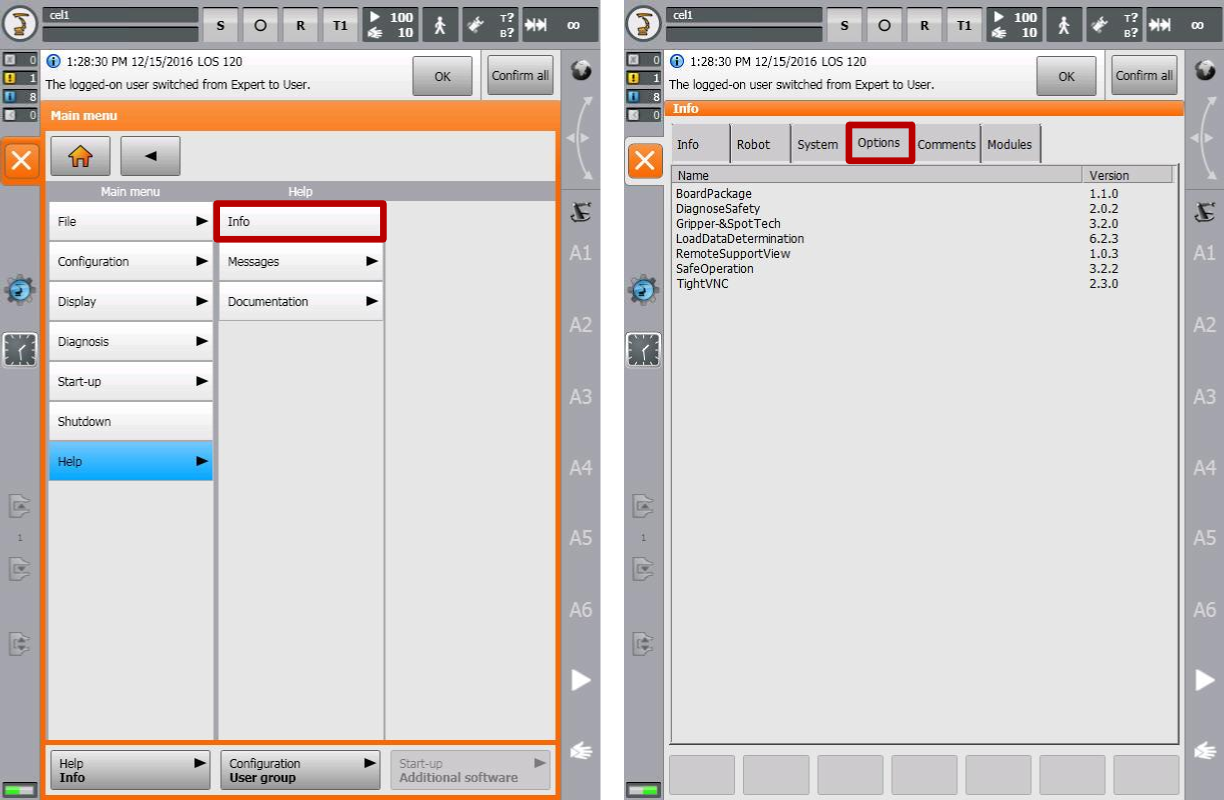
Go to the Main Menu, then Help > Info, and select the Options tab.
The Main Menu is reachable by clicking the  icon in the top left corner.
If an entry named EthernetKRL is listed, the option is installed.
Attention
If EthernetKRL is not listed, as in the image below (right), this KUKA option must first be purchased and installed. The integration will not work without this. EthernetKRL is an official KUKA software package for data exchange over Ethernet, and can be acquired via my.KUKA.
Log on as Expert
Copying the integration files and editing the SPS file both require expert privileges.
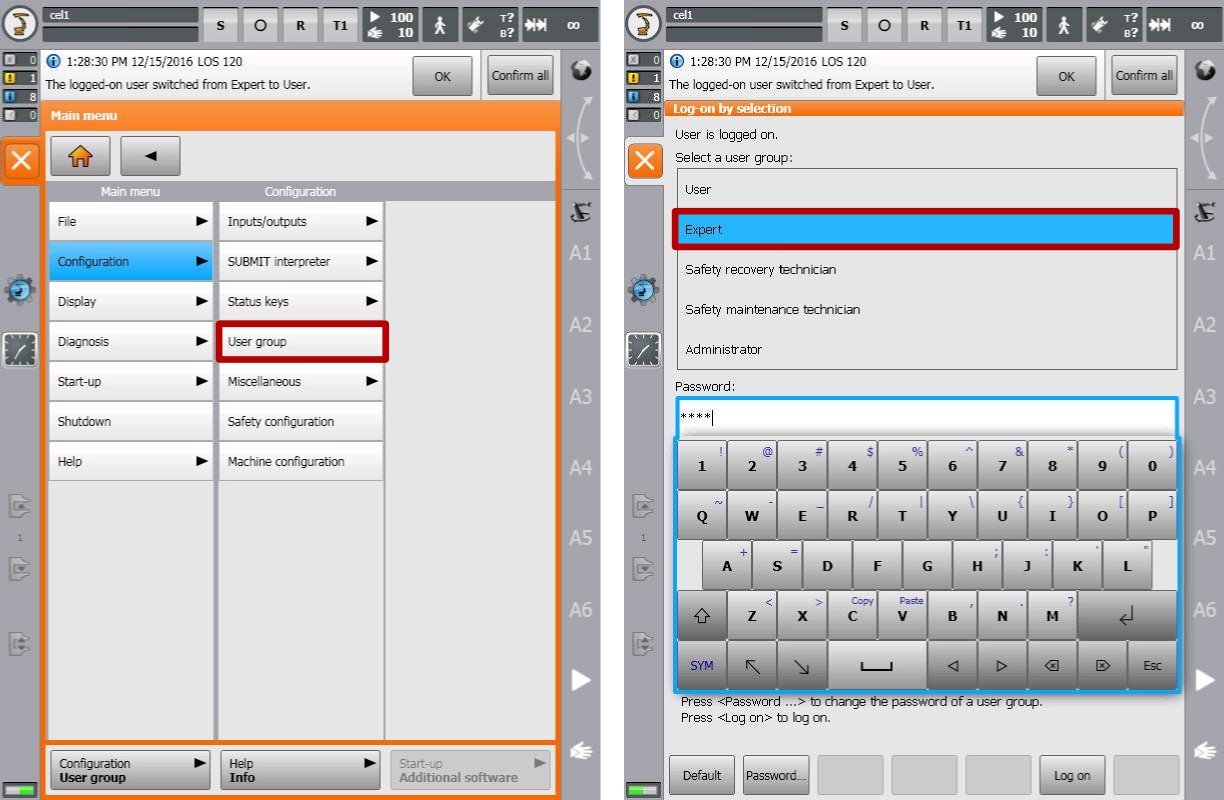
To log on as expert, go to Main Menu , then Configuration > User group and select the Expert group.
Setting up the network connection
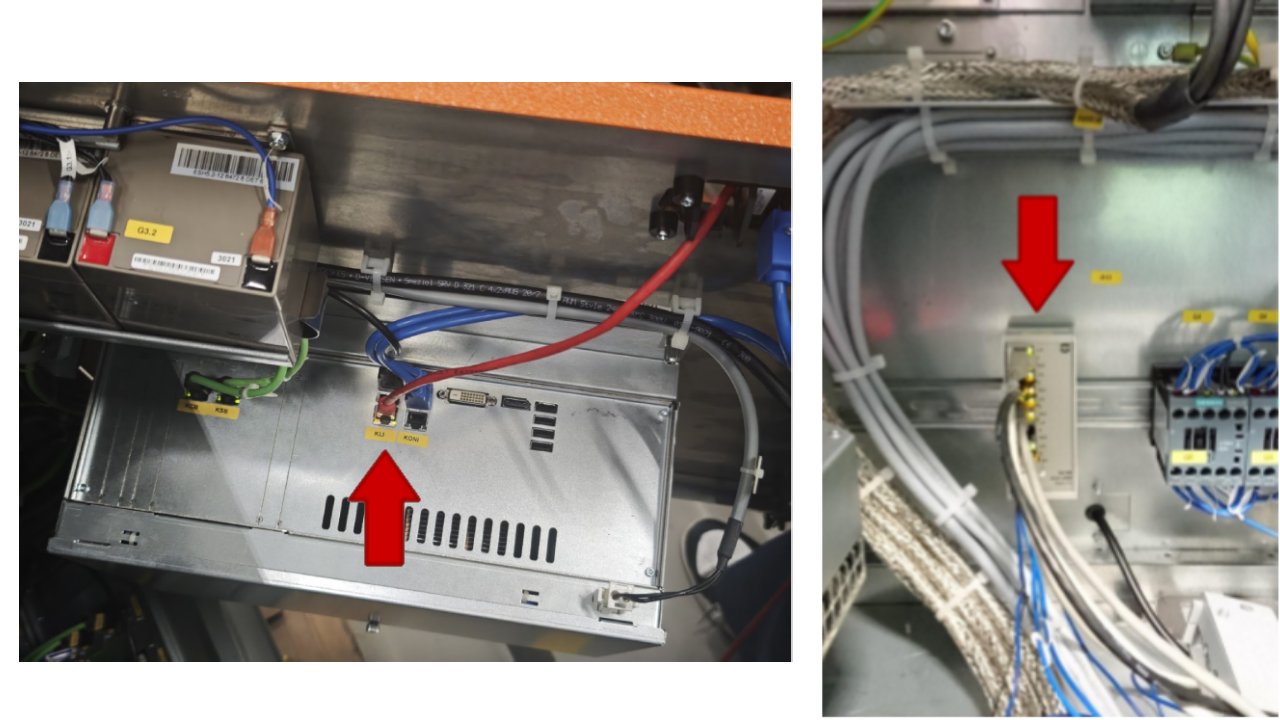
An Ethernet cable should connect the KLI port of the controller (also referred to as X66) to the Pickit processor ROBOT port as described here.
The location of the controller Ethernet KLI port may vary depending on the controller model. The images below show example locations: cabinet door (left), or built-in switch (right).
The controller KLI port and the Pickit ROBOT port must have a different IP address in the same same subnet.
The Pickit ROBOT port address is changed from the Pickit web interface, as described here.
To change the controller address, put the robot in T1 mode, log on as expert and go to Main Menu
, then Start-up > Network configuration.
Attention
When communicating with KUKA robots, the KUKA KLI port and Pickit server IP address cannot belong to the following IP ranges:
169.254.0.0 to 169.254.255.255
192.168.0.0 to 192.168.0.255
172.16.0.0 to 172.16.255.255
172.17.0.0 to 172.17.255.255
The default Pickit server IP is 169.254.5.180, which belongs to the first range, so it must be modified.
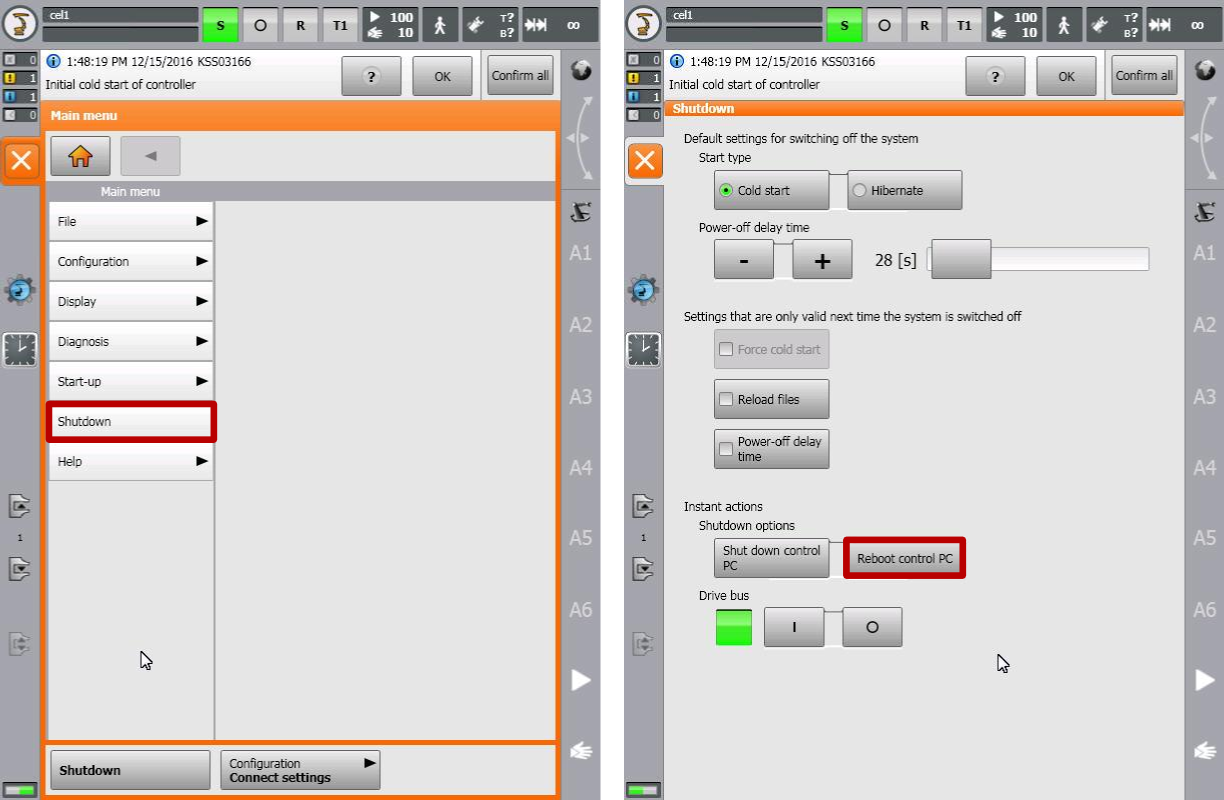
A change to the controller network configuration only takes effect after a cold reboot.
To do so, go to Main Menu , then Shutdown, select the Cold start start type and click the Reboot control PC button.
Loading the program files
Download the Pickit KUKA files here.
Before copying, deselect the active SPS.SUB in the submit interpreter, so that nothing is running in the background. To do this, select the S in the smartPAD status bar, and click Deselect.
Copy the files to the controller, either with WorkVisual or from a USB drive plugged into a USB port of the controller cabinet. Depending on the controller model, the USB port could be located on the front of the cabinet (as in the image below), or inside the cabinet door next to the KLI port.
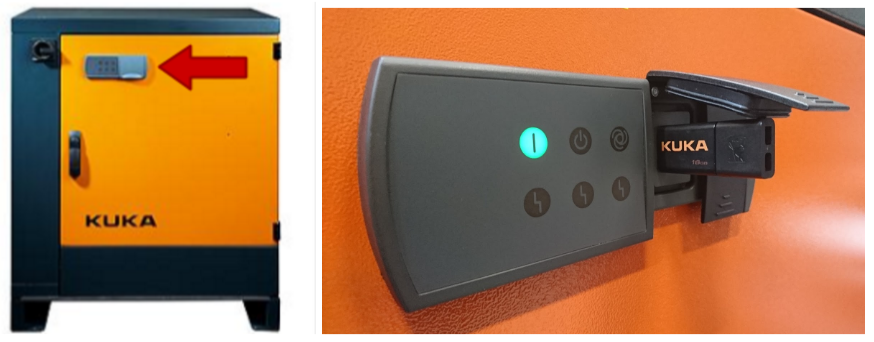
Copy all files from the downloaded package to the following locations on the controller:
From the downloaded package |
To the controller |
|---|---|
KRC/R1/Program/Pickit/ |
KRC:\R1\Program\Pickit\ |
KRC/R1/TP/Pickit/ |
KRC:\R1\TP\Pickit\ |
These are the two sets of files that relate to Pickit communication:
Pickit application files. These are example programs that illustrate how to perform typical Pickit operations, like robot-camera calibration or object detection for pick and place. These are located in R1 > Program > Pickit.
Pickit interface files. These are the actual integration files that define the high-level functions used by the application files, and manage socket-level TCP/IP communication with the Pickit system. These files are not meant for editing and are located in R1 > TP > Pickit.
The Pickit application files can be loaded and executed as any other KUKA KRL-program. Refer to the KUKA user manuals for further details.
Configuring the EthernetKRL channel
Copy KRC/EthernetKRL/Pickit.xml from the downloaded package to the following location on the controller:
C:\KRC\ROBOTER\Config\User\Common\EthernetKRL\Pickit.xml
In the file, set <IP> to the Pickit ROBOT port IP address (not the controller’s KLI address), and leave <PORT> at 5001.
Warning
Do not rename the file. The file name is the key used by the integration to open the communication channel, and it is case sensitive. Only one
Pickit.xmlmay exist on the controller.Do not change anything in the file other than
<IP>.
No controller restart is needed for this step.
SPS file settings
One command needs to be added to the SPS file, which executes in the background of all robot programs. You need to be in expert mode to perform this operation.
To open the SPS file from the navigator, browse to R1 > System, select the SPS.SUB file and click Open, as shown in the figure below, left.
Once the file is open, move the cursor to the USER PLC line and click on Open/close fold, and add a line calling the PickitSps() function, as shown in the figure below, right.
Finally, close the file to save and exit (orange close icon  in the left panel).
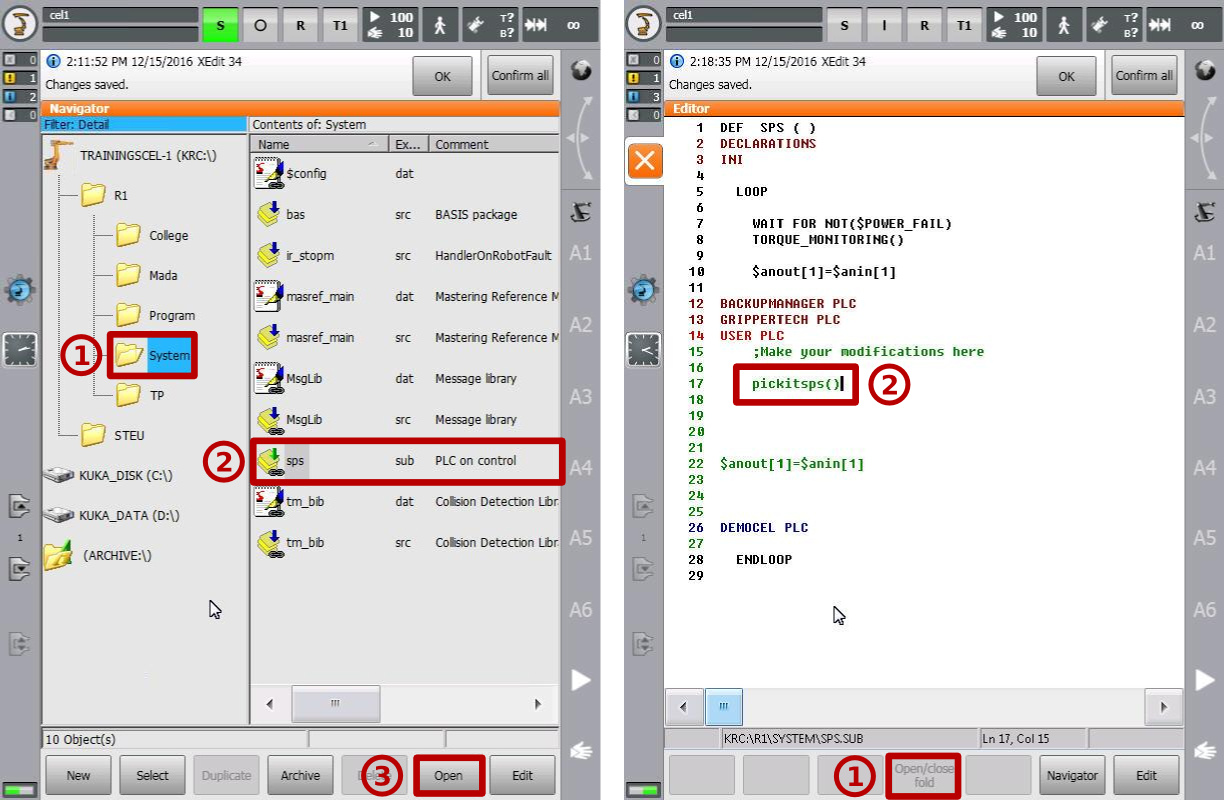
The PickitSps() function runs the communication with Pickit in the background.
Finally, reselect the SPS.SUB in the submit interpreter and make sure that it is running, indicated by a green S icon in the smartPAD status bar.
Verifying the communication
The PickitCheck program confirms that the robot and Pickit can communicate.
It involves no robot motion and changes nothing on Pickit.
Pickit must be powered on.
Select PickitCheck in R1 > Program > Pickit, put the robot in T1 mode and press Start.
The program sends a single request to Pickit and reports the result on the smartPAD:
Message |
Meaning |
|---|---|
|
Pass. The full round trip works. |
|
Pass. Communication works. Enable robot mode in the Pickit web interface. |
|
Fail. The Pickit message shown right before it names the cause. |
A communication failure stops the program at a HALT before it reports.
Press Start to continue.
One of the following messages may be shown:
Pickit: not connected. Check network, Pickit power and IP addressPickit: no response within the command timeoutPickit: PickitSps() not running. Check SPS.SUB and submit
On the Pickit web interface, you should see the robot connection symbol in the top bar. When moving the robot, you should see the robot flange frame moving in the 3D view.
Tip
A tool and a base need to be selected on the controller before Pickit receives a robot pose. If the robot pose is not updated when moving the robot, verify that the SPS file is set up as described above.
The connection to the robot can also be pinged from the Pickit side via the web interface: Testing the Robot to Pickit connection.
Migrating from a Connect KRC installation
This integration replaces the older one based on the KUKA Connect KRC module, and no longer requires that licensed module.
Every public Pickit_* function keeps its original name and behavior, so existing robot programs keep working after updating to the new integration.
The two integrations cannot coexist: they share data structures and function names, and installing this one on top of Connect KRC results in compilation errors. The cleanest way is to completely remove the Connect KRC package and its files using WorkVisual. Alternatively, delete the following four files via the smartPAD:
KRC:\R1\TP\ConnectKRC\Pickit\pickit_functions.src
KRC:\R1\TP\ConnectKRC\Pickit\pickit_functions.dat
KRC:\R1\TP\ConnectKRC\Pickit\PickitSps.sub
KRC:\R1\TP\ConnectKRC\connectKRC.dat
Deselect the active SPS.SUB in the submit interpreter before deleting.
Nothing else needs to be removed.
Confirm that the files are still gone after a reboot, otherwise the removal with WorkVisual is required.
Then follow the installation steps described above and adapt the existing robot programs:
Object dimensions are now correct. The old integration had a bug and reported the dimensions 1000 times too small.
Pickit_object_dim_1(),Pickit_object_dim_2()andPickit_object_dim_3()now return millimeters. Search the robot programs forPickit_object_dim_and undo any compensation that was built around this, such as an added factor of 1000 or thresholds written 1000 times too small.MultPos and MultAngle are functions now, not constants. A program that uses either needs parentheses:
MultPos()/MultAngle()instead ofMultPos/MultAngle.Recalibrate. This integration computes the robot flange pose differently than the old one. It is advised to redo the robot-camera calibration, even if the camera has not moved. Afterwards, rebuild the region of interest and the background cloud if needed.